
Marshmallow Rice Krispies Halloween Brains That Actually Look Gross (In a Good Way!)
Okay, so I’ve been making these creepy brain treats for Halloween parties for like three years now, and let me tell you—they’re disgustingly perfect. And by disgustingly, I mean people literally go “EWWW” when they see them, then immediately grab two.
My sister-in-law first showed me this recipe after her kids’ school Halloween party was a total hit. She was like, “You HAVE to try these marshmallow rice krispies brains!” And honestly? I thought she was nuts. Regular Rice Krispies treats shaped like brains? How hard could it be, right?
Wrong. So wrong.
First attempt was basically just pink Rice Krispies that looked more like… well, let’s just say they didn’t look like brains. More like sad, deflated balloons. My 6-year-old took one look and said, “Mom, these look like boogers.” Thanks, kiddo.
But here’s the thing—I’m stubborn. And I was NOT about to let marshmallow rice krispies beat me. After some serious trial and error (and way too much food coloring on my kitchen counter), I figured out the secret. It’s all about the texture and getting those gross, wrinkly brain ridges just right.
Table of Contents
What Makes These Halloween Brains Actually Work
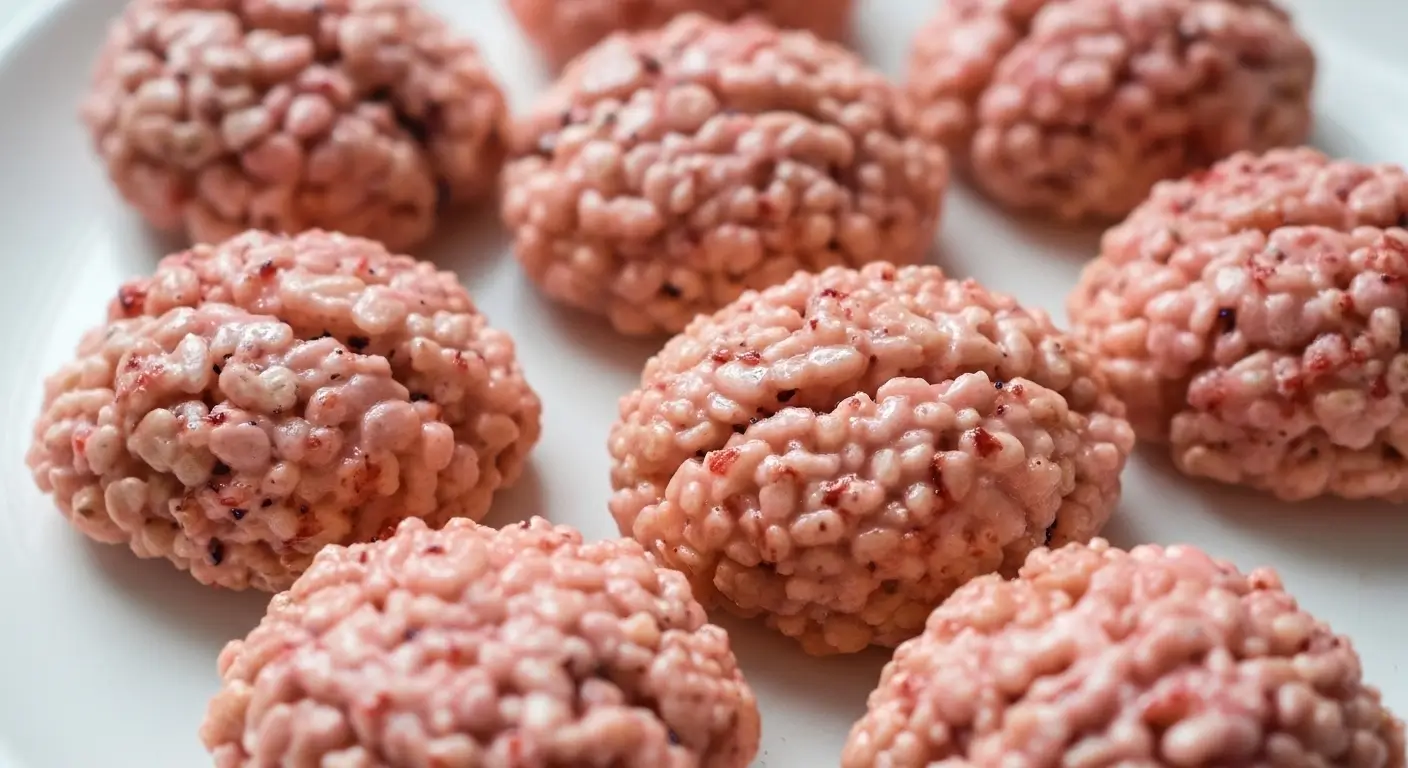
Look, I’m gonna be honest with you. The key isn’t just making regular Rice Krispies treats and adding food coloring. That’s amateur hour. You need to think about how real brains look—all those folds and creases and, um, wet-looking parts.
The magic happens with the marshmallow mixture. Instead of melting everything down completely smooth like you would for normal treats, you want it slightly lumpy. Sounds weird, I know. But trust me on this one.
And the coloring? Don’t just go for straight pink. That looks like cotton candy, not brains. You need that grayish-pink color with some darker streaks. I learned this after my second failed batch looked more like bubble gum than anything remotely scary.
Oh, and here’s something nobody tells you—the shaping has to happen while the mixture is still pretty warm. Wait too long and you’re stuck with a solid brick of Rice Krispies that you can’t mold. Been there. It’s frustrating.
The Ingredients (And My Shopping Disasters)
Here’s what you’ll need, and trust me, get the good stuff:
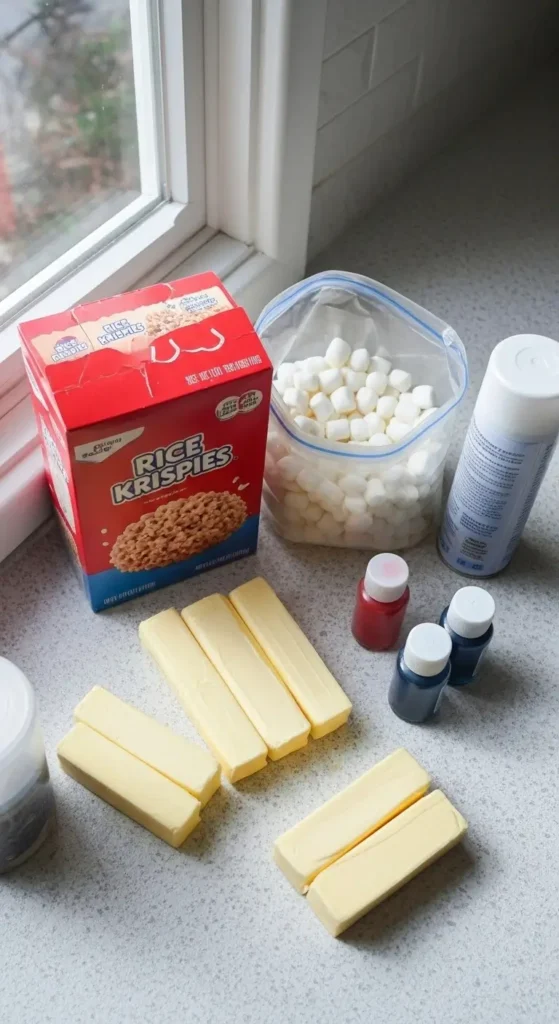
• 6 cups Rice Krispies cereal (don’t cheap out and buy the store brand—learned this lesson the hard way) • 4 tablespoons butter (real butter, not that margarine nonsense) • 1 package (10 oz) mini marshmallows (again, name brand works better) • Red food coloring (gel works way better than liquid) • Pink food coloring • A tiny bit of blue food coloring (seriously, just a drop) • Cooking spray (for your hands—you’ll thank me later)
Now, about shopping for this stuff. Last Halloween, I went to three different stores looking for gel food coloring because apparently everyone else had the same brain idea (pun intended). The liquid coloring from the baking aisle works okay, but you need SO much more of it, and it makes the mixture too wet.
And please, for the love of all that’s holy, buy extra marshmallows. I don’t know what it is about melting marshmallows, but I always seem to burn the first batch. Maybe it’s because I get distracted by my neighbor’s dog barking, or maybe I’m just impatient. Either way, backup marshmallows are your friend.
The Step-by-Step (With All My Mistakes)
Step 1: Prep Your Space Line a couple baking sheets with parchment paper. Don’t skip this step—I did once and spent twenty minutes scraping brain bits off my counter. Not fun.
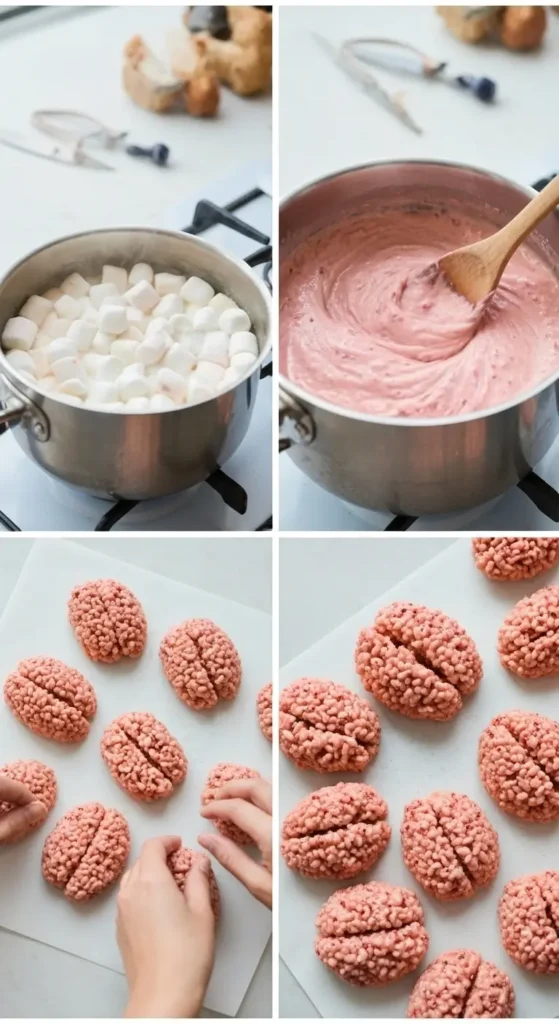
Step 2: Melt the Butter In a large pot (and I mean LARGE—this mixture expands), melt your butter over medium-low heat. Don’t crank the heat up because you’re impatient like me. Medium-low. Trust the process.
Step 3: Add the Marshmallows Dump in those mini marshmallows and start stirring. Here’s where it gets tricky—you want them mostly melted but not completely smooth. Think chunky peanut butter consistency, not smooth. This is what gives you those brain-like bumps later.
Step 4: The Coloring Magic Now for the fun part. Start with pink food coloring—maybe 4-5 drops if you’re using gel. Mix it in. Then add 2-3 drops of red. You want that flesh-colored base.
Here’s the secret nobody tells you: add just ONE tiny drop of blue. I know, it sounds crazy. But that little bit of blue makes it look more realistic and less like a cartoon. Don’t go overboard—I once turned an entire batch purple by accident.
Step 5: Add the Rice Krispies Remove from heat and quickly stir in the Rice Krispies. And I mean quickly. This stuff starts setting up fast. Stir until everything’s coated, but don’t overmix. You want some variation in color distribution—real brains aren’t evenly colored, right?
Step 6: The Shaping Part (Most Important!) Spray your hands with cooking spray. This is crucial. Without it, you’ll be picking sticky marshmallow off your fingers for hours.
Grab handfuls of the mixture and start shaping them into brain shapes. Think oval-ish, but lumpy. Press your fingers into the surface to create those characteristic brain folds and ridges.
The key is working while it’s still warm and pliable. If it starts getting too stiff, pop the whole bowl in the microwave for 10-15 seconds to soften it up again.
Step 7: Final Details While they’re still slightly warm, use a knife to make deeper grooves down the middle and around the sides. This is what really sells the brain illusion.
Let them cool completely on your parchment-lined baking sheets. They’ll firm up as they cool.
My Hard-Learned Tips
After making these way too many times, here’s what I’ve figured out:
Temperature matters big time. Too hot and you’ll burn your hands trying to shape them. Too cool and they won’t hold their shape. There’s like a 5-minute sweet spot where everything works perfectly.
Size consistency helps. I used to make them all different sizes, which looked weird when they were all together. Aim for about the size of a tennis ball. Any bigger and they’re too much to eat. Any smaller and they just look like pink lumps.
The color gets darker as they cool. So if you think they look too light while you’re mixing, they’ll probably be perfect once they’re done. I used to keep adding more coloring and ended up with these super dark, almost maroon brains that looked more diseased than scary-fun.
And here’s something weird I discovered by accident—if you brush them very lightly with a tiny bit of corn syrup after they’re shaped, they get this slightly wet, gross shine that makes them look even more realistic. My husband thinks this is taking it too far, but the kids absolutely love it.
What Could Go Wrong (From Experience)
Everything, basically. But here are the big ones:
The mixture can seize up if you get water in it. This happened to me when I was washing dishes and got a drop of water on my spoon. Suddenly I had this weird, hard blob instead of moldable marshmallow mixture. You can sometimes save it by adding a tablespoon of butter and reheating, but sometimes you just gotta start over.
Overcooking the marshmallows makes them tough and chewy instead of soft and gooey. Keep the heat low and be patient. I know it takes forever, but rushing this step ruins everything.
And honestly? Sometimes the coloring just doesn’t work right. I’ve had batches turn out orange, purple, and once this weird brown color that looked more like chocolate than brains. When this happens, I just roll with it and call them “alien brains” or something.
Serving These Gross Things
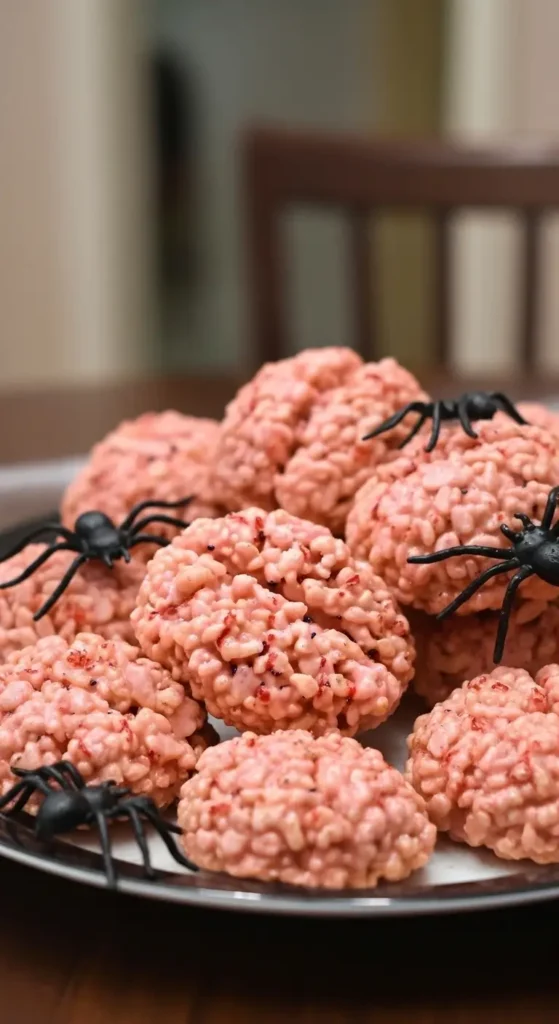
I usually make about 12-15 brain shapes from this recipe, depending on size. They’re perfect for Halloween parties, school events, or just grossing out your family on a random Tuesday.
Fair warning—kids love these, but they get sticky fingers. Have napkins ready. Lots of napkins.
Adults think they’re hilarious until they try one, then they’re like, “Oh, these are actually really good.” Because underneath all the gross appearance, they’re just really good Rice Krispies treats.
I like to arrange them on a dark plate or tray, maybe with some fake blood (corn syrup and red food coloring) drizzled around for extra effect. My neighbor Sarah always goes overboard and adds plastic spiders and stuff, but honestly, the brains are gross enough on their own.
Storage and Making Ahead
These keep for about a week in an airtight container, but they’re definitely best the first day or two. After that, they start getting a little stale around the edges.
You can make them a day ahead of your party, no problem. Just don’t stack them directly on top of each other—they’ll stick together. Layer them between sheets of parchment paper if you need to stack them.
Don’t put them in the fridge unless it’s super hot in your kitchen. Cold makes them hard and less brain-like. Room temperature is perfect.
Final Thoughts
Look, I’ll be straight with you—these marshmallow rice krispies Halloween brains aren’t going to win any culinary awards. But they’re fun, they’re gross in the best way possible, and they’re surprisingly easy once you get the hang of it.
My kids request these every Halloween now, and honestly, I’ve started making them for other occasions too. Made some green ones for a zombie theme party, and last year I did gray ones for a “mad scientist” birthday party.
The best part? Watching people’s faces when they first see them. The initial “ewww” followed by curiosity, then the inevitable “these are actually really good!” It never gets old.
So give them a try. And when you inevitably mess up the first batch (because everyone does), just remember—even failed brain treats taste good. They just look like… well, failed brain treats.
Happy Halloween, and may your marshmallow rice krispies be appropriately disgusting! 🧠
Let me know in the comments how yours turn out—and please tell me I’m not the only one who’s burned through multiple batches learning this stuff!
If this dessert brought a little joy to your day, why stop here? I’ve got a whole collection of indulgent treats and easy bakes waiting for you to try. Take a peek at more of my favorite desserts Here

I’ve always found peace in the kitchen—it’s where I go to unwind, experiment, and reconnect. I started this blog because I wanted to share that feeling with others. My cooking journey started in a tiny apartment kitchen, with a second-hand skillet and a lot of trial and error.
Since then, I’ve learned that the best meals aren’t the most complicated—they’re the ones made with love (and maybe a little butter). Whether you’re a beginner or a kitchen pro, I hope you’ll feel right at home here.