
Spooky Peanut Butter Spider Cookies That’ll Make You Scream (With Joy)
Okay, so I messed this up twice before getting it right. But trust me on this one—these spooky peanut butter spider cookies are absolutely worth the trial and error. My neighbor’s kids won’t stop asking for them, and honestly? I don’t blame them.
Look, I’m gonna be honest with you. I’m not some fancy baker who went to culinary school or anything. I’m just a regular person who really loves Halloween and happens to make a decent peanut butter cookie. But here’s the thing… when October rolls around, I go a little overboard with the spooky stuff.
Table of Contents
How These Little Monsters Came to Life
This whole spider cookie thing started three years ago when my 8-year-old nephew came over and declared my regular cookies “boring.” Boring! Can you believe that? So naturally, I took it as a personal challenge. I mean, what’s more fun than turning innocent peanut butter cookies into creepy crawlies?
The first attempt was… well, let’s call it a learning experience. I tried using chocolate chips for the body and pretzel sticks for legs. Disaster. Complete disaster. The pretzels got soggy, the chocolate chips melted everywhere, and the whole thing looked like a cookie crime scene.
Then I remembered those mini peanut butter cups sitting in my pantry from last Halloween (don’t judge me for hoarding candy). And boom—spider bodies sorted. The chocolate drizzle legs came to me in a moment of pure genius… or maybe it was just the third cup of coffee talking.
Why These Spooky Peanut Butter Spider Cookies Work
Here’s what makes these cookies special: they’re basically foolproof once you know the tricks. The peanut butter cookie base is chewy but sturdy enough to hold all the spider decorations. And the best part? You can make the cookies ahead of time and turn them into spiders later when you’re ready to have some fun.
My sister-in-law, who’s usually pretty critical about baked goods (love you, Sarah!), said these were “actually really good” which is basically a five-star review coming from her. The kids think they’re hilarious, and the adults secretly love them too.
What You’ll Need for These Creepy Crawlers

Now, here’s where I tell you to go shopping. And please, for the love of all that’s holy, don’t try to substitute everything. I learned this the hard way.
For the Peanut Butter Cookies:
- 1 cup creamy peanut butter (I use Jif, fight me)
- 1/2 cup granulated sugar
- 1/2 cup packed brown sugar (the dark stuff works best)
- 1 large egg
- 1 teaspoon vanilla extract
- 1 1/4 cups all-purpose flour
- 1/2 teaspoon baking soda
- 1/4 teaspoon salt
For the Spider Transformation:
- 24 mini peanut butter cups (unwrapped, obviously)
- 1/2 cup semi-sweet chocolate chips
- 48 candy eyes (or you can make them with white chocolate and mini chocolate chips if you’re feeling ambitious)
Actually, you know what? About those candy eyes—I’ve tried making my own and buying the pre-made ones. Just buy them. Your sanity will thank you later.
Let’s Make Some Magic (The Cookie Part)
Step 1: Preheat your oven to 350°F. I know, I know, everyone forgets this step including me about half the time. Set a timer or something.
Step 2: In a large bowl, cream together the peanut butter, granulated sugar, and brown sugar. I use a hand mixer because I’m not trying to get an arm workout while baking. Beat it for about 2-3 minutes until it’s nice and fluffy.
Step 3: Add the egg and vanilla extract. Mix until everything’s combined. This is where the mixture starts looking like actual cookie dough instead of… whatever it was before.
Step 4: In a separate bowl (yes, another bowl, sorry), whisk together flour, baking soda, and salt. I used to just dump everything together, but that leads to lumpy cookies. Learn from my mistakes.
Step 5: Gradually add the dry ingredients to the wet mixture. Don’t overmix this—just stir until it comes together. Overmixing makes tough cookies, and nobody wants tough spooky peanut butter spider cookies.
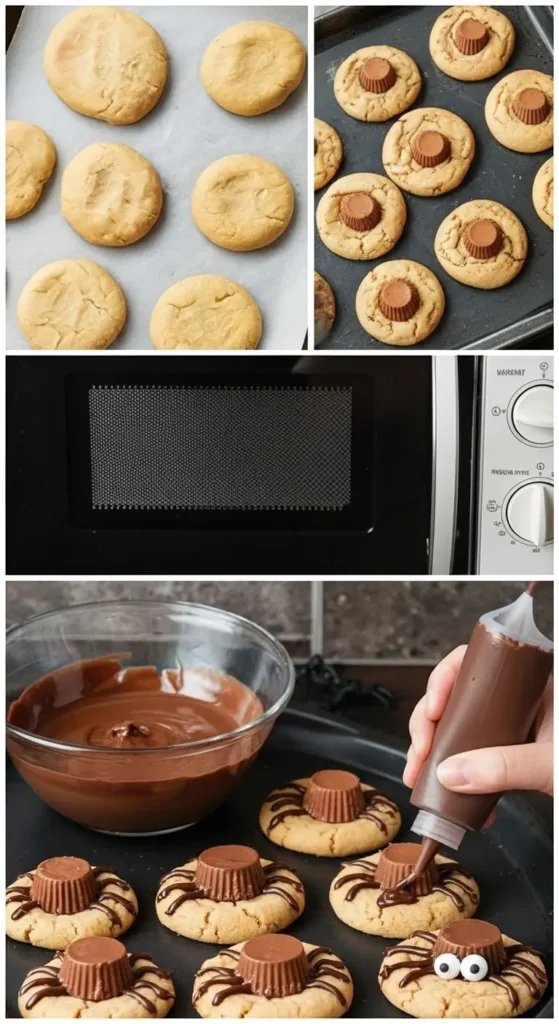
Step 6: Roll the dough into 24 balls, about 1 1/2 inches each. Place them on ungreased baking sheets about 2 inches apart. They spread quite a bit, so don’t crowd them unless you want one giant mega-cookie.
Step 7: Here’s the key part—use a fork to make that classic peanut butter cookie crisscross pattern. But don’t press too hard! We need some structure left for our spider friends.
Step 8: Bake for 10-12 minutes. They should be lightly golden around the edges but still soft in the center. Don’t overbake them—they’ll continue cooking on the hot pan after you take them out.
Step 9: As soon as they come out of the oven (and I mean immediately), gently press a mini peanut butter cup into the center of each cookie. The heat will soften the candy just enough to stick.
Let them cool completely on the baking sheets. This is torture, I know, but trust the process.
The Spider Transformation (Where the Magic Happens)
This is honestly the most fun part. Put on some Halloween music and embrace your inner artist.
Step 1: Melt the chocolate chips. I use the microwave in 30-second intervals, stirring between each one. Don’t let it burn—chocolate has a vendetta against impatient people.
Step 2: Transfer the melted chocolate to a squeeze bottle or a plastic bag with a tiny corner cut off. If you’re using a plastic bag, cut the smallest hole possible. You can always make it bigger, but you can’t make it smaller.
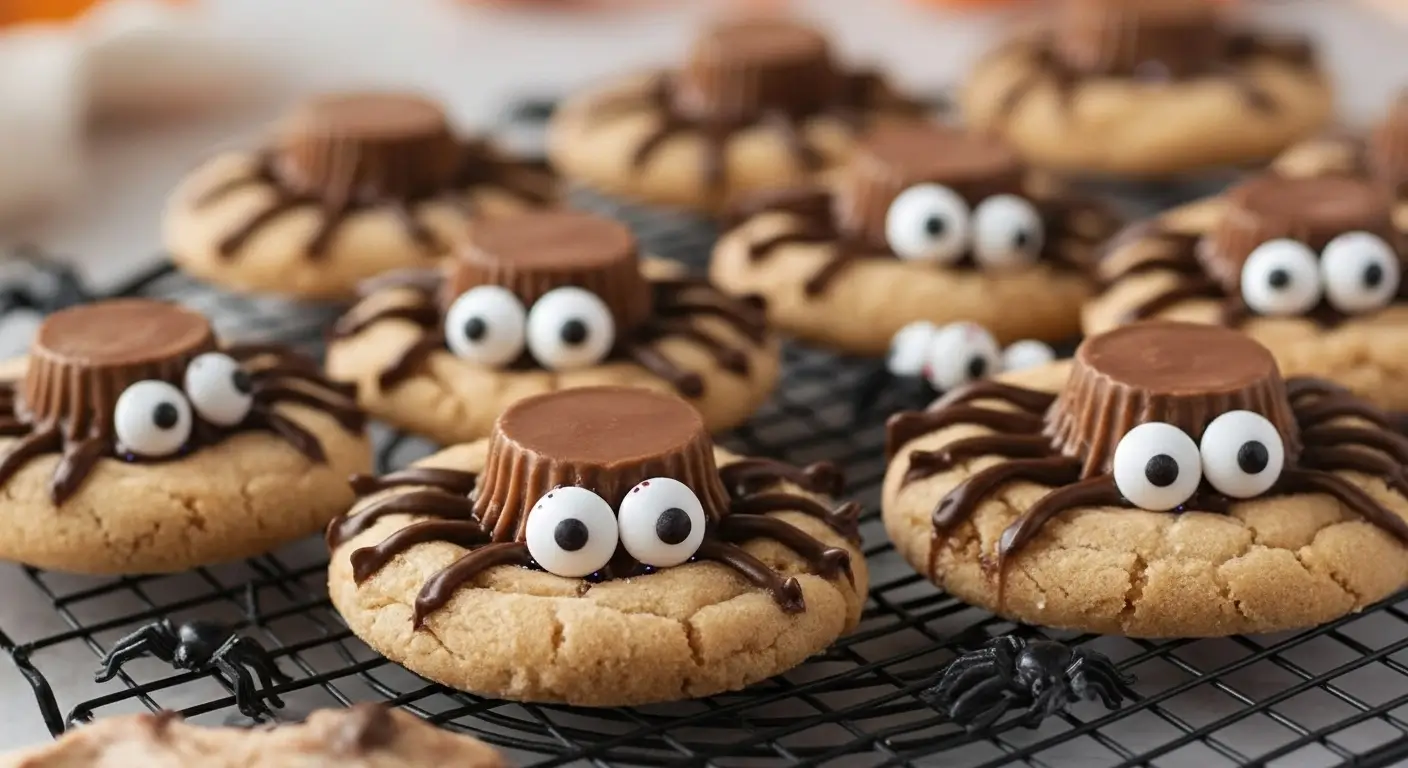
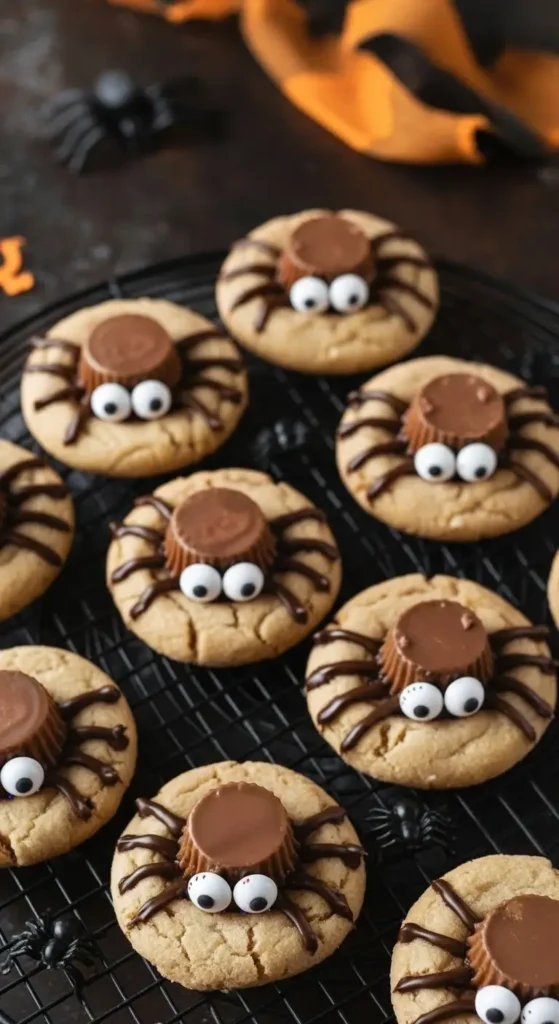
Step 3: Working quickly (melted chocolate waits for no one), draw four lines on each side of the peanut butter cup to create spider legs. Start from the “body” and curve them slightly downward. They don’t have to be perfect—wonky legs just make them look more realistic.
Step 4: While the chocolate is still soft, gently press two candy eyes onto the front of each peanut butter cup. Position them so your spiders are looking slightly upward. It makes them look more… alive. In a good way.
Step 5: Let everything set for about 30 minutes. The chocolate needs time to harden, and the eyes need to stay put.
The Things I Wish Someone Had Told Me
After making these spooky peanut butter spider cookies probably fifty times (okay, maybe not fifty, but close), here are my hard-earned tips:
Temperature matters. If your kitchen is really warm, stick the finished cookies in the fridge for 10 minutes to set the chocolate legs. Otherwise, they might slide off and you’ll have legless spiders, which is somehow even more disturbing.
Make extra. Seriously. I thought 24 cookies would be plenty for a small Halloween party. I was wrong. So very wrong.
Storage is simple. Keep them in an airtight container at room temperature for up to a week. The cookies stay soft, and the decorations hold up well.
Don’t stress about perfection. My first batch had wonky eyes and uneven legs, and you know what? The kids didn’t care. They thought they were hilarious.
When Things Go Wrong (Because They Will)
Let me tell you about the time I tried to make these when my oven was acting up. The cookies spread too much and the peanut butter cups sank completely. Instead of spider cookies, I had… well, I’m not sure what I had, but it wasn’t pretty.
If your cookies spread too much, your dough might be too warm. Chill it for 30 minutes before baking. If the peanut butter cups won’t stick, your cookies might not be hot enough when you add them. The residual heat is what makes everything work.
And if your chocolate legs break? It happens. Melt a little more chocolate and try again. The beauty of these spooky peanut butter spider cookies is that they’re supposed to look a little imperfect and creepy.
The Verdict
Look, I’m not gonna lie and say these are health food. They’re peanut butter cookies with candy on top. But for Halloween? They’re absolutely perfect. The peanut butter flavor is rich and satisfying, the mini cups add the perfect amount of chocolate sweetness, and the whole spider thing just makes people smile.
My mom, who’s usually pretty reserved about sweets, grabbed three of these at our last family gathering. Three! That woman has the willpower of a saint normally.
Final Thoughts on These Creepy Crawlers
Every October, I get requests to make these spooky peanut butter spider cookies for various parties and gatherings. Last year, I made them for my coworker’s kid’s school party, my book club’s Halloween meeting, and my neighbor’s annual costume party.
The best part? Watching people’s faces when they first see them. There’s always this moment of “Oh my god, are those spiders?” followed immediately by “Can I have two?”
Kids love them because they look scary but taste amazing. Adults love them because they bring out their inner child. And I love them because they’re actually pretty simple once you get the hang of it.
So go ahead, give these a try. Your Halloween spread needs something fun and delicious, and these spooky peanut butter spider cookies deliver on both counts. Just maybe make a double batch—trust me on this one.
Happy baking! (And may your spider legs stay attached!)
If this dessert brought a little joy to your day, why stop here? I’ve got a whole collection of indulgent treats and easy bakes waiting for you to try. Take a peek at more of my favorite desserts Here

I’ve always found peace in the kitchen—it’s where I go to unwind, experiment, and reconnect. I started this blog because I wanted to share that feeling with others. My cooking journey started in a tiny apartment kitchen, with a second-hand skillet and a lot of trial and error.
Since then, I’ve learned that the best meals aren’t the most complicated—they’re the ones made with love (and maybe a little butter). Whether you’re a beginner or a kitchen pro, I hope you’ll feel right at home here.