

The Cheesy Chicken Broccoli Orzo That Saved My Weeknights
Okay, so I messed this up exactly four times before getting it right. Four. Times. And I’m gonna be honest with you – I was ready to give up and just order pizza again when my neighbor knocked on the door asking if everything was okay because of all the smoke. That was attempt number three, by the way.
But here’s the thing… when I finally nailed this cheesy chicken broccoli orzo recipe, it became the hero of my weeknight dinners. My 8-year-old, who literally refuses to eat anything green and once cried over a single pea on his plate, somehow devours this. Go figure.
Table of Contents
How This Recipe Happened (The Messy Truth)
Look, I’m not gonna pretend this came to me in some magical cooking epiphany. I was standing in my kitchen last month, staring at some leftover rotisserie chicken, a bag of frozen broccoli that had been taking up freezer space for weeks, and a box of orzo I bought thinking it was rice. Don’t ask.
My husband was working late again, the kids were being… well, kids, and I needed something that wouldn’t take forever but would actually fill everyone up. Something with vegetables that didn’t look like vegetables, you know?
I think I originally saw something similar on Pinterest… or maybe it was my friend Sarah’s Instagram story? Honestly can’t remember. But I took that basic idea and completely made it my own through trial and error. Mostly error.
What You’ll Need (And My Shopping Disasters)
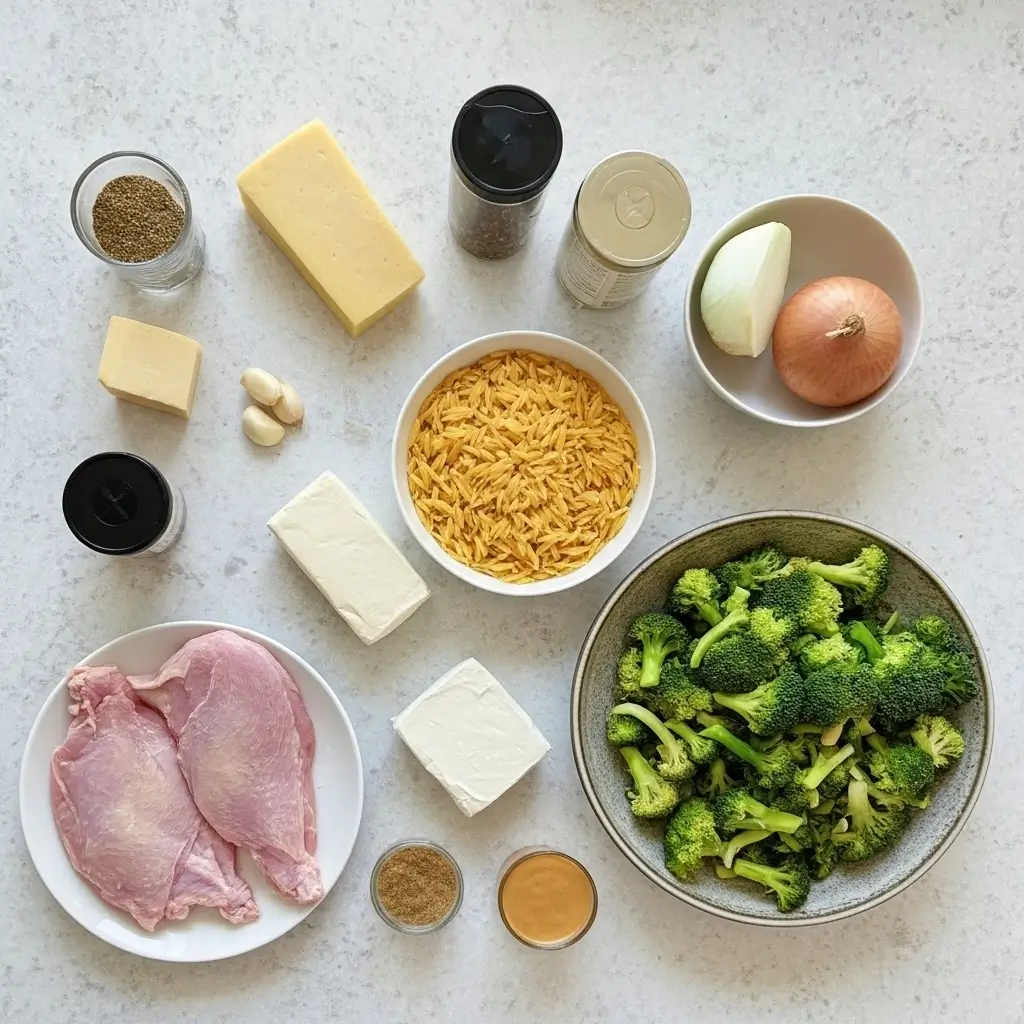
The Main Players:
- 1 pound boneless chicken breasts (or thighs if you want more flavor – I’ve done both)
- 1 cup orzo pasta (seriously, it’s not rice, I learned this the hard way)
- 2 cups fresh broccoli florets (or frozen, I won’t judge)
- 1½ cups shredded sharp cheddar cheese (please don’t use the pre-shredded stuff in bags, it’s gross)
- ½ cup cream cheese (the real stuff, not light)
- 2 cloves garlic, minced (I use way more because I’m obsessed)
- 1 small onion, diced
- 2 cups chicken broth (I always keep the cartons around)
- ½ cup heavy cream
- 2 tablespoons olive oil
- 1 teaspoon Italian seasoning
- Salt and pepper to taste
- Optional: red pepper flakes if you like a tiny kick
Shopping tip: Good luck finding decent fresh broccoli this time of year. I’ve started buying the pre-cut florets from the produce section because cutting up a whole head while my toddler is “helping” is basically impossible.
Also, about that cheese – I made the mistake once of buying pre-shredded because I was lazy, and it just doesn’t melt the same way. Something about the anti-caking agents. Just grate it yourself, or ask the deli counter to do it. Trust me on this one.
The Method (Where Everything Can Go Wrong)
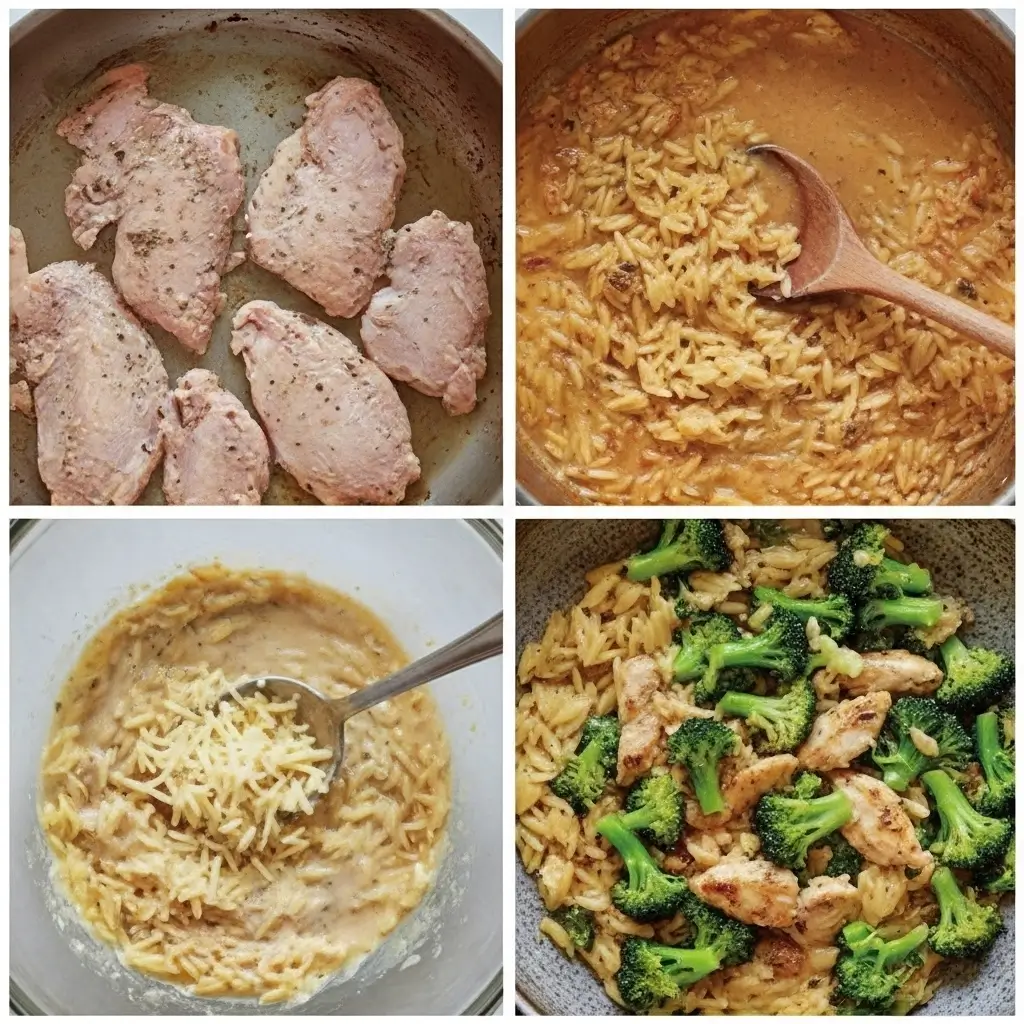
Step 1: Get Your Chicken Sorted Season those chicken breasts with salt, pepper, and Italian seasoning. Heat olive oil in a large skillet over medium-high heat. Cook the chicken for about 6-7 minutes per side until golden and cooked through.
Now here’s where I messed up the first time – I tried to rush this part because I was hangry, and I ended up with chicken that looked done on the outside but was still pink inside. Set a timer for this. Remove chicken and let it rest, then dice it up.
Actually, you know what? Just use rotisserie chicken if you have it. Life’s too short.
Step 2: The Veggie Situation In the same pan (don’t wash it – you want those chicken bits for flavor), add diced onion. Cook for about 3 minutes until softened. Add minced garlic and cook for another 30 seconds.
Pro tip: Don’t walk away during the garlic step. Last Tuesday, my neighbor knocked on the door about a package delivery, and I came back to completely burned garlic. Had to start over. The whole kitchen smelled like regret.
Step 3: Orzo Time Add the orzo to the pan and stir it around for a minute. This is called toasting, and it makes a difference in flavor. Then pour in the chicken broth slowly – it’s gonna bubble up like crazy, so don’t panic.
Bring it to a boil, then reduce heat and simmer for about 10 minutes, stirring occasionally. The orzo should absorb most of the liquid but still look a little saucy.
Step 4: Broccoli Drama Add your broccoli florets and cook for another 3-4 minutes until bright green and tender. If you’re using frozen broccoli, add it straight from the freezer – no need to thaw. It’ll release some water, but that’s fine.
My kids prefer their broccoli pretty soft, so I cook it a bit longer than some people might like. Adjust based on your family’s preferences.
Step 5: The Cheese Magic Here’s where it gets good. Lower the heat to low – this is important because cream cheese can get weird if it’s too hot. Add the cream cheese in chunks and stir until melted and smooth.
Pour in the heavy cream and stir everything together. It’ll look kinda lumpy and gross at first, but that’s totally normal. Keep stirring over low heat until it comes together into this gorgeous, creamy sauce.
Add the diced chicken back in, then gradually add the shredded cheddar cheese, stirring constantly. Don’t dump it all in at once or it might seize up into a weird clumpy mess (been there).
Step 6: Final Touches Taste and season with salt and pepper. I usually need more salt than I expect. If you want a little heat, sprinkle in some red pepper flakes.
Let everything simmer together for 2-3 minutes to meld all the flavors. If it looks too thick, add a splash more broth or cream. Too thin? Let it cook a bit longer.
My Random Discoveries and Kitchen Wisdom
Okay, so through my many failures, I learned some things:
About the orzo: Don’t overcook it in step 3. It’s going to keep cooking in the sauce, and nobody wants mushy pasta. I learned this when I got distracted by a phone call and came back to what looked like rice pudding. Disaster.
The cheese situation: Room temperature cream cheese mixes in way better than cold cream cheese. If you forget to take it out early (which I always do), just microwave it for 15-20 seconds to soften it up.
Broccoli preferences: My family is split on this. Husband likes it crunchy, kids like it soft, I like it somewhere in between. I’ve started adding half the broccoli earlier and half later to make everyone happy. Sometimes being a mom means weird compromises.
Leftover magic: This actually tastes better the next day. The flavors have time to hang out and get to know each other. Reheat it gently with a splash of cream or broth to loosen it up.
When Things Go Wrong (They Will)
If your sauce breaks: Don’t panic. Remove it from heat and whisk in a tablespoon of cold cream or broth. It usually comes back together.
If it’s too salty: Add more cream or broth to dilute it. I’ve also added a squeeze of lemon juice, which sounds weird but actually helps balance things out.
If the kids complain: Mine eat this with ketchup. I don’t ask questions. Happy kids, happy life.
If you burn something: Been there. If it’s just the bottom of the pan, carefully transfer everything to a clean pan and keep going. If it’s actually burned-burned, just order pizza and try again tomorrow.
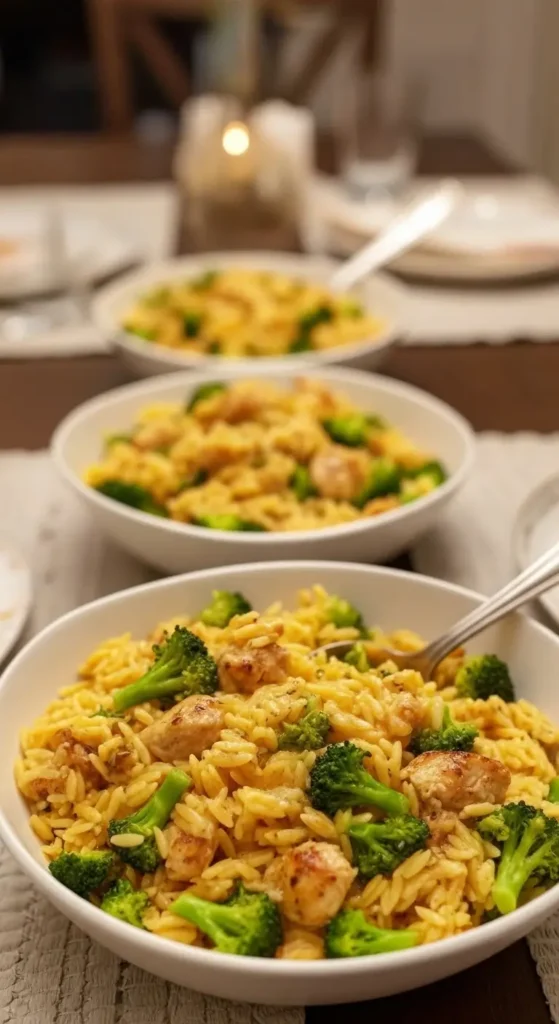
Why This Recipe Actually Works
Look, I’m not gonna lie and say this is the healthiest thing you’ll ever make. But it’s got protein, vegetables, and it makes my family happy. Sometimes that’s enough.
The orzo is genius because it’s like pasta and rice had a baby, and kids think it’s fun to eat. The cheese makes everything better (obviously), and the chicken makes it filling enough that nobody’s asking for snacks an hour later.
I’ve made this for potluck dinners, sick friends, and that time my mother-in-law visited unexpectedly. It’s become my go-to “I need to feed people something that looks like I know what I’m doing” recipe.
Serving suggestions: I usually make a simple side salad, but let’s be real – the kids ignore it anyway. Sometimes I throw some garlic bread in the oven if I’m feeling fancy. This is also amazing with a glass of wine after the kids go to bed. Just saying.
Final Thoughts
Is this fancy? Nope. Is it going to win any culinary awards? Probably not. But will your family actually eat it without complaining? Very likely.
I’ve tweaked this recipe so many times based on what’s in my fridge, what’s on sale, and what my kids are willing to tolerate that week. Use what you have, taste as you go, and don’t stress if it doesn’t look exactly like mine.
The best part? It freezes really well. I usually make a double batch and freeze half for those nights when even thinking about cooking feels impossible.
Let me know how yours turns out! Seriously, I love hearing about other people’s cooking adventures and disasters. We’re all just doing our best here.
Happy cooking! (And may your smoke alarms stay quiet) 🍽️
Prep Time: 15 minutes
Cook Time: 25 minutes
Total Time: 40 minutes
Serves: 4-6 people (or my family of 4 with leftovers)

I’ve always found peace in the kitchen—it’s where I go to unwind, experiment, and reconnect. I started this blog because I wanted to share that feeling with others. My cooking journey started in a tiny apartment kitchen, with a second-hand skillet and a lot of trial and error.
Since then, I’ve learned that the best meals aren’t the most complicated—they’re the ones made with love (and maybe a little butter). Whether you’re a beginner or a kitchen pro, I hope you’ll feel right at home here.