
Balsamic Baked Chicken Breast with Mozzarella Cheese
I’ll be honest with you – there was a time when I thought chicken breast was just boring. You know what I mean? That dry, flavorless protein that you choke down because it’s “healthy.” But then I discovered this balsamic baked chicken breast with mozzarella cheese recipe, and everything changed.
It happened on one of those frantic Tuesday nights when I was staring into my fridge, desperately trying to figure out what to make for dinner. I had some chicken breasts that needed to be used up, a bottle of balsamic vinegar that had been sitting in my pantry forever, and some fresh mozzarella from the weekend’s grocery haul. I thought, “Why not throw them all together and see what happens?” Best impulse decision I’ve made in the kitchen, hands down.
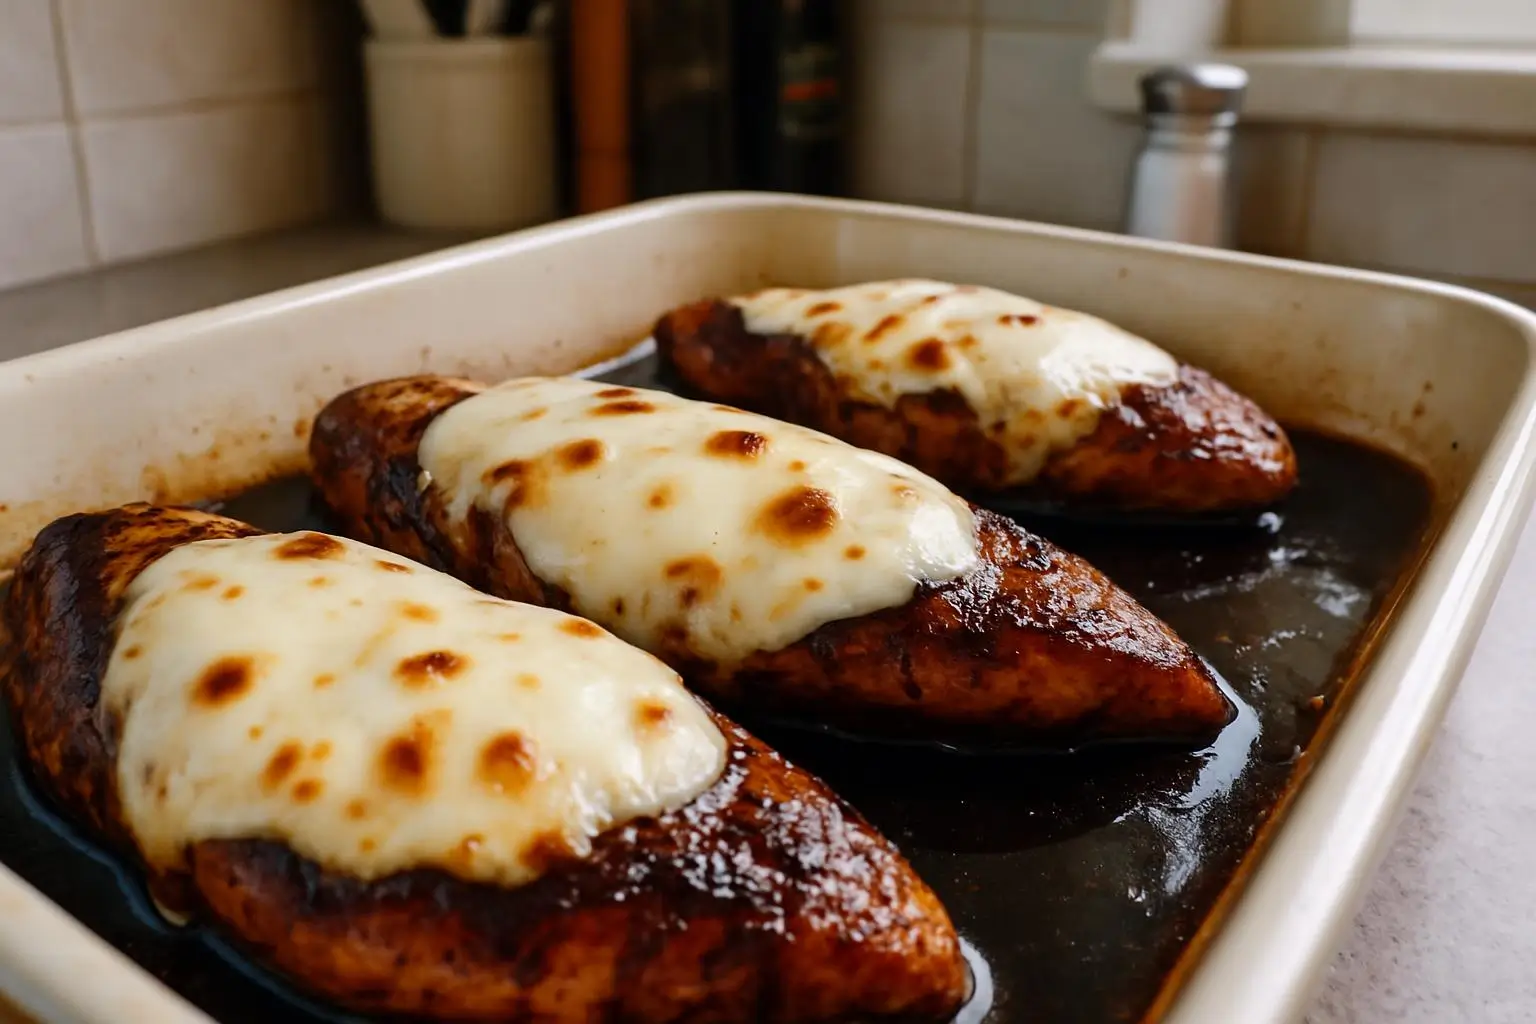
The magic happens when that tangy balsamic vinegar caramelizes in the oven, creating this incredible glaze that’s both sweet and acidic. Add melted mozzarella on top, and you’ve got yourself a restaurant-quality dish that takes maybe thirty minutes from start to finish. My kids actually ask for seconds now when I make chicken, which is saying something.
Table of Contents
Why You’ll Love This Balsamic Chicken Recipe
This balsamic baked chicken breast has become my go-to weeknight dinner for so many reasons. First off, it’s incredibly simple – we’re talking five ingredients here, people. But don’t let that fool you into thinking it’s bland. The balsamic vinegar does all the heavy lifting, creating layers of flavor that make this chicken anything but ordinary.
The prep time is practically nonexistent. You literally just season the chicken, drizzle everything in a baking dish, and let the oven do its thing. While it’s baking, you can throw together a side salad or get those green beans roasting. It’s the kind of meal that makes you look like you’ve got your life together, even when you definitely don’t.
And can we talk about how juicy this chicken stays? I used to be that person who overcooked chicken breast until it resembled cardboard. But the balsamic creates this protective coating that keeps all those juices locked in. The result is tender, flavorful chicken that actually makes you excited to eat your protein.
What You’ll Need
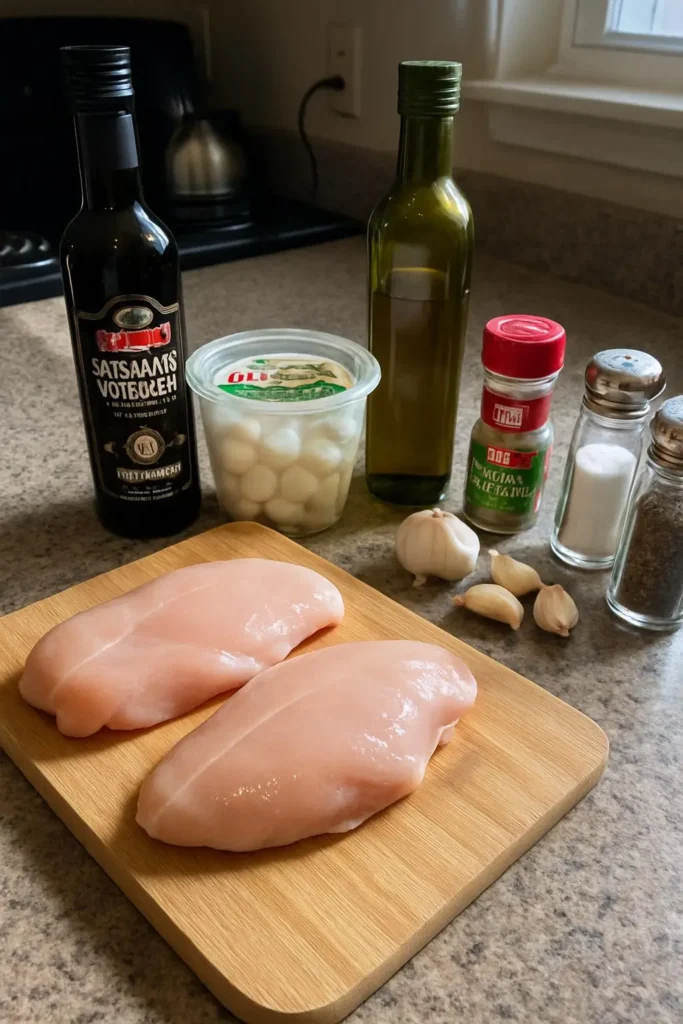
Chicken Breast: I always go for boneless, skinless chicken breasts, and I try to pick ones that are roughly the same thickness so they cook evenly. If you’ve got thick pieces, don’t be afraid to pound them out a bit – I use a meat mallet, but honestly, a rolling pin works just fine.
Balsamic Vinegar: This is where you don’t want to cheap out too much. I’m not saying you need the fancy aged stuff, but a decent quality balsamic vinegar makes a real difference in the final flavor. The cheap stuff can be pretty harsh and won’t give you that beautiful glaze.
Fresh Mozzarella: I prefer fresh mozzarella over the pre-shredded kind for this recipe. It melts differently – more creamy and less rubbery. You can usually find it in the deli section, those little balls packed in water. Just drain it and slice it up.
Olive Oil: Extra virgin olive oil adds richness and helps everything caramelize beautifully in the oven.
Garlic: Fresh garlic is best here. I usually mince about three cloves, but if you’re a garlic lover like me, feel free to add more.
Italian Seasoning: A good Italian seasoning blend brings together oregano, basil, thyme, and rosemary. If you don’t have a premade blend, just mix whatever dried herbs you have on hand.
Salt and Black Pepper: Don’t skip the seasoning step. Chicken breast needs salt to bring out its flavor, and freshly cracked black pepper adds a nice little kick.
Let’s Make It
Step 1: Get Your Oven Ready
Preheat your oven to 425°F. I know it seems hot, but trust me on this one. The high heat is what creates that gorgeous caramelization on the balsamic glaze. While it’s heating up, grab a 9×13 inch baking dish and give it a light coating of cooking spray or a drizzle of olive oil.
Step 2: Prep the Chicken
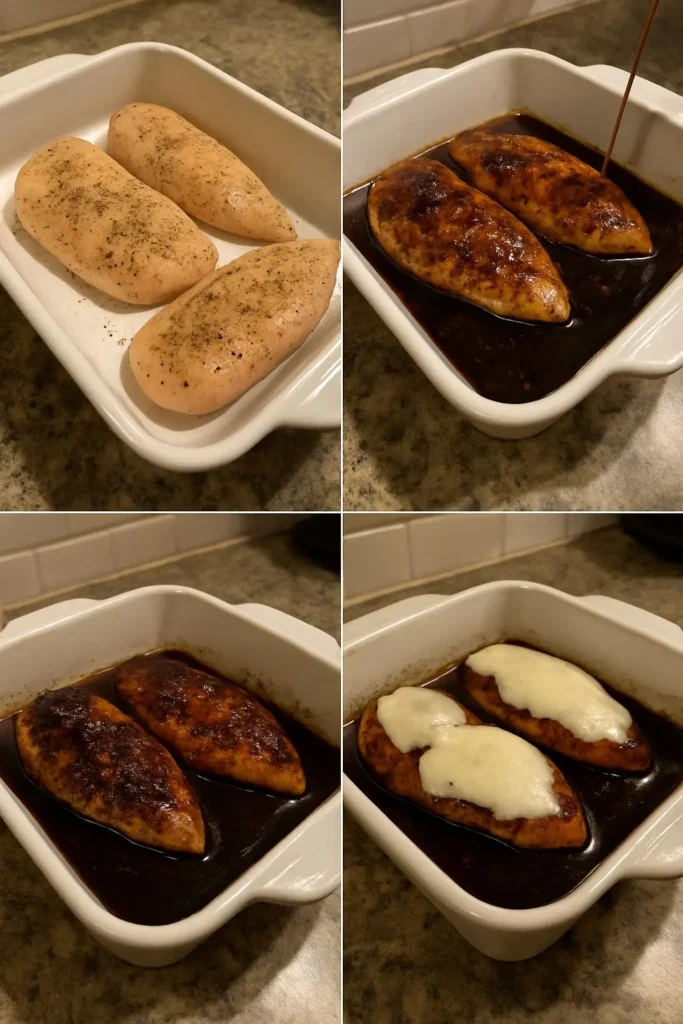
Pat your chicken breasts completely dry with paper towels – this is important for getting a good sear. Season both sides generously with salt and pepper. I like to let them sit for about five minutes after seasoning to let the salt work its magic.
If your chicken breasts are on the thicker side (more than about an inch), you’ll want to butterfly them or pound them to an even thickness. I learned this the hard way after serving chicken that was perfectly cooked on the outside and still pink in the middle. Nobody wants that dinner party disaster.
Step 3: Create the Balsamic Mixture
In a small bowl, whisk together the balsamic vinegar, olive oil, and minced garlic. Don’t worry if it doesn’t stay perfectly mixed – oil and vinegar like to do their own thing, and that’s totally fine.
Step 4: Arrange and Bake
Place the seasoned chicken breasts in your prepared baking dish. Pour that balsamic mixture right over the top, making sure each piece gets coated. Sprinkle the Italian seasoning over everything.
Pop it in the oven for about 15-18 minutes. The exact timing depends on the thickness of your chicken, but you’re looking for an internal temperature of 165°F. I always keep a meat thermometer handy because nobody has time for guesswork when it comes to chicken safety.
Step 5: Add the Cheese
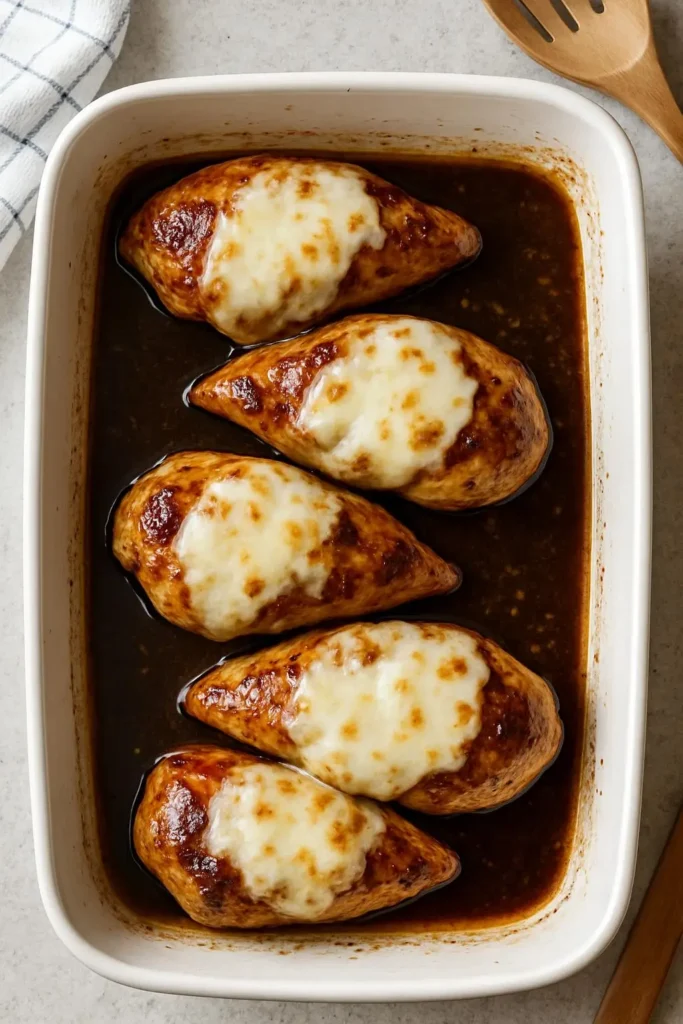
Here’s where it gets exciting. Pull the baking dish out of the oven and top each chicken breast with slices of fresh mozzarella. Return it to the oven for another 3-5 minutes, just until the cheese is melted and starting to get those golden spots.
The smell that fills your kitchen during those last few minutes is absolutely incredible. That’s the balsamic caramelizing and the cheese getting all bubbly and perfect.
Tips from My Kitchen
Don’t Move the Chicken: I know it’s tempting to flip or move the chicken around, but resist the urge. Let it sit in that balsamic mixture and do its thing. Moving it around will just prevent that beautiful caramelization from happening.
Make It Your Own: This recipe is super forgiving and loves variations. Sometimes I add sliced cherry tomatoes around the chicken for the last ten minutes of cooking. Or I’ll throw in some fresh basil leaves right before serving. Red pepper flakes are amazing if you like a little heat.
Thickness Matters: I can’t stress this enough – even thickness means even cooking. If you’ve got one really thick breast and one thin one, they’re going to finish at completely different times. Take the extra minute to even them out.
Let It Rest: After you pull it from the oven, let the chicken rest for about five minutes before slicing. This lets the juices redistribute, so you don’t lose all that moisture when you cut into it.
Serving Suggestions
This balsamic baked chicken pairs beautifully with so many sides. My family’s favorite combination is with garlic roasted asparagus and some crusty bread to soak up that amazing balsamic glaze. But it’s also fantastic over a bed of pasta – the leftover pan juices make an incredible sauce when you toss them with some hot noodles.
For a lighter option, I love serving it over a simple arugula salad. The peppery greens are perfect with that sweet and tangy balsamic flavor. Sometimes I’ll add some cherry tomatoes and a drizzle of the pan juices as dressing.
Rice pilaf is another winner, especially if you want something that’ll soak up all those delicious flavors. And honestly? Sometimes we just eat it with a simple side of steamed broccoli and call it a day. Not every meal needs to be complicated.
How to Store and Reheat
Leftovers keep beautifully in the refrigerator for up to four days. I store the chicken in an airtight container with any leftover pan juices – they help keep everything moist.
When it comes to reheating, I’ve found the oven works better than the microwave. Just pop it in a 350°F oven for about 10-15 minutes until heated through. The microwave tends to make the cheese rubbery, which is such a shame after you’ve created this beautiful dish.
You can also slice the leftover chicken and use it in salads, sandwiches, or pasta dishes throughout the week. It’s one of those versatile proteins that tastes great cold or hot.
Mistakes I’ve Made (So You Don’t Have To)
Let me tell you about the time I used cheap balsamic vinegar. I thought vinegar was vinegar, right? Wrong. The cheap stuff was so harsh and acidic that it completely overpowered the dish. Spend the extra couple dollars on something decent – your taste buds will thank you.
I’ve also learned not to use pre-shredded mozzarella for this recipe. Those little bags of shredded cheese have anti-caking agents that prevent them from melting as smoothly as fresh mozzarella. You end up with clumpy, weird-textured cheese instead of that gorgeous melted blanket you’re going for.
And please, please don’t skip the resting time after cooking. I was impatient once and sliced right into the chicken as soon as it came out of the oven. All those beautiful juices ran right out onto the cutting board instead of staying in the meat where they belonged.
This balsamic baked chicken breast with mozzarella has earned its place in our regular dinner rotation, and I have a feeling it’ll become a favorite in your house too. It’s proof that the best recipes don’t need to be complicated – sometimes the simplest combinations create the most incredible flavors. Give it a try next time you’re staring at some chicken breasts and wondering what to do with them. I promise you won’t be disappointed.

I’ve always found peace in the kitchen—it’s where I go to unwind, experiment, and reconnect. I started this blog because I wanted to share that feeling with others. My cooking journey started in a tiny apartment kitchen, with a second-hand skillet and a lot of trial and error.
Since then, I’ve learned that the best meals aren’t the most complicated—they’re the ones made with love (and maybe a little butter). Whether you’re a beginner or a kitchen pro, I hope you’ll feel right at home here.