
The Best Frankie Rolls That’ll Transport You Straight to Mumbai Street Food Heaven
Last summer, my neighbor invited me over for what she called “Indian street food night,” and I had absolutely no idea what I was in for. She handed me this warm, wrapped bundle that looked like a burrito but smelled like heaven – all spicy and aromatic with hints of mint and cilantro. One bite of that chicken frankie, and I was completely hooked.
I spent the next three months trying to recreate that exact flavor at home. I called her approximately twelve times asking for details, watched countless YouTube videos, and probably annoyed every Indian restaurant owner in town with my questions. But here’s what I discovered: frankies aren’t just Indian burritos – they’re this perfect combination of soft, flaky bread wrapped around spiced fillings that somehow manages to be both comforting and exciting at the same time.
This frankie rolls recipe is the result of all that obsessive testing. I’ve streamlined it so you can make authentic-tasting frankies in your own kitchen without hunting down twenty different spices or special equipment. The key is getting that bread just right – soft enough to wrap but sturdy enough to hold all the good stuff inside.
Table of Contents
Why You’ll Love These Frankie Rolls
Frankies are basically the ultimate comfort food disguised as street food. They’re handheld, customizable, and incredibly satisfying. Think of them as the Indian cousin of a wrap, but with way more personality and flavor.
What makes these special is the bread itself. Unlike regular tortillas or flatbreads, frankie bread has this unique texture that’s soft and pliable but with just enough chew to make it interesting. It’s enriched with a little oil and milk, which gives it that tender quality that makes all the difference.
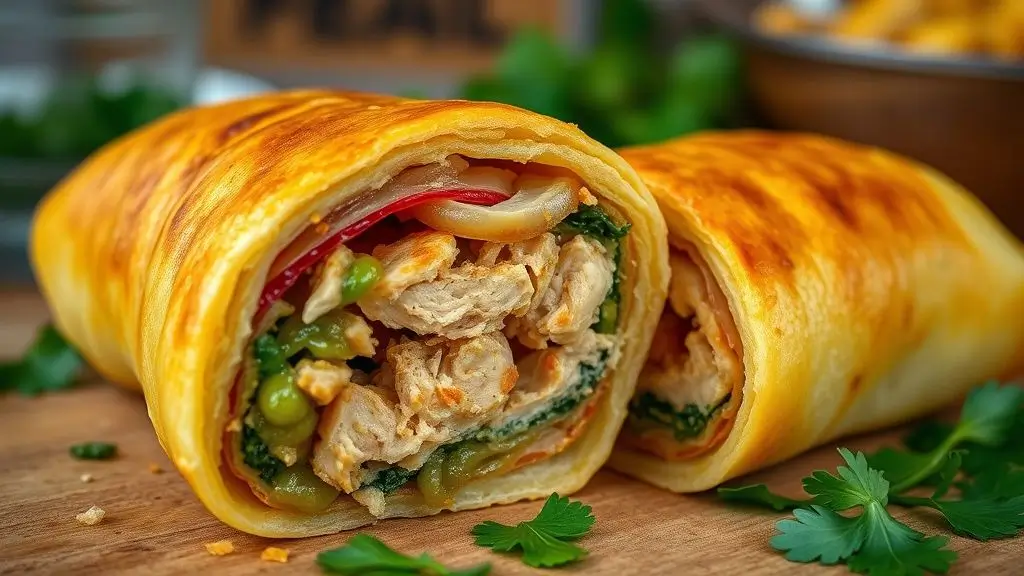
The filling possibilities are endless, but I’m sharing my go-to chicken version that’s become a weekly staple in our house. It’s got perfectly spiced chicken, fresh vegetables, and that iconic mint-cilantro chutney that ties everything together. My kids request these more often than pizza now, which is saying something.
What You’ll Need
For the Frankie Bread:
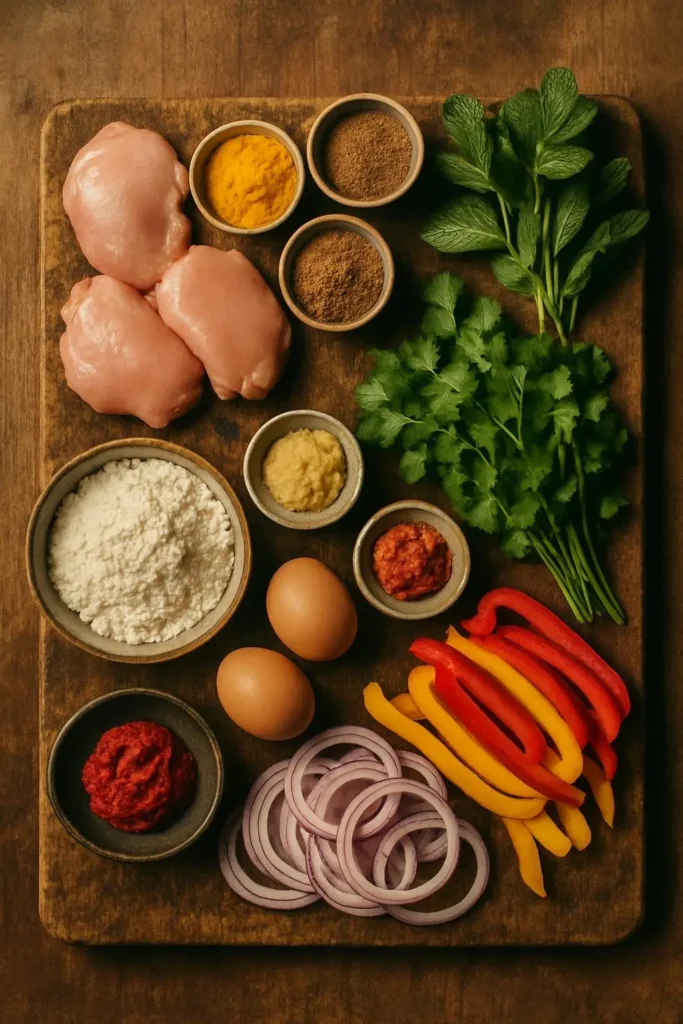
- 2 cups all-purpose flour
- 1/2 teaspoon salt
- 1/4 cup vegetable oil
- 1/4 cup warm milk
- 1/4 cup warm water
- 1 teaspoon sugar
For the Chicken Filling:
- 1 pound boneless chicken thighs, cut into strips
- 2 medium onions, thinly sliced
- 1 bell pepper, sliced
- 2 tablespoons vegetable oil
- 1 teaspoon ginger-garlic paste
- 1 teaspoon cumin powder
- 1 teaspoon coriander powder
- 1/2 teaspoon turmeric powder
- 1 teaspoon garam masala
- 1/2 teaspoon red chili powder
- Salt to taste
- 2 tablespoons tomato paste
For the Green Chutney:
- 1 cup fresh mint leaves
- 1 cup fresh cilantro
- 2 green chilies
- 1 inch piece of ginger
- 2 tablespoons lemon juice
- Salt to taste
- 2 tablespoons water
For Assembly:
- 2 eggs, beaten
- Sliced onions
- Sliced tomatoes
- Chat masala
- Lemon wedges
Let me tell you about these ingredients. I use chicken thighs instead of breasts because they stay juicier and have more flavor. The combination of spices might look long, but each one adds something important to the overall taste profile.
The green chutney is absolutely crucial – it’s what makes frankies taste authentic. Don’t skip it or try to substitute with regular mint sauce. This stuff is bright, spicy, and adds that fresh pop that balances all the warm spices.
Let’s Make It
Making the Frankie Bread
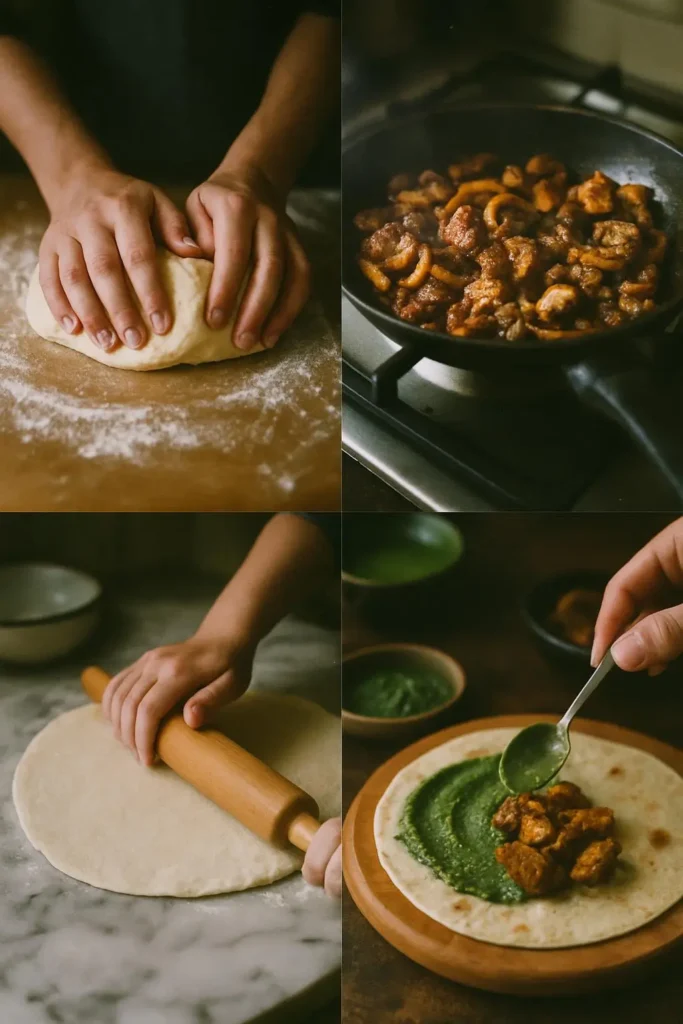
In a large bowl, whisk together flour and salt. Make a well in the center and add the oil, warm milk, warm water, and sugar. Mix everything together until it forms a rough dough.
Turn the dough out onto a floured surface and knead for about 8-10 minutes until it’s smooth and elastic. This is important – you want a really well-developed dough that’s going to give you that perfect texture.
Place the dough in an oiled bowl, cover with a damp towel, and let it rest for at least 30 minutes. This resting time allows the gluten to relax, making the dough easier to roll out.
Preparing the Green Chutney
While the dough is resting, make your chutney. In a food processor or blender, combine mint leaves, cilantro, green chilies, ginger, lemon juice, salt, and water. Blend until smooth and bright green.
Taste and adjust seasoning. It should be tangy, spicy, and incredibly fresh. This keeps in the fridge for up to a week, so you can make it ahead of time.
Cooking the Chicken Filling
Heat oil in a large skillet over medium-high heat. Add the sliced onions and cook until they’re golden brown and caramelized, about 8-10 minutes. Don’t rush this step – those sweet, caramelized onions are what give the filling its depth.
Add the ginger-garlic paste and cook for another minute until fragrant. Then add all the spices – cumin, coriander, turmeric, garam masala, and chili powder. Cook for 30 seconds until the spices bloom.
Add the tomato paste and cook for 2-3 minutes until it darkens slightly. Then add the chicken strips and bell pepper. Cook, stirring frequently, until the chicken is cooked through and everything is well combined, about 10-12 minutes.
Season with salt and set aside. The chicken should be well-coated with the spice mixture and look deeply golden.
Rolling and Cooking the Bread
Divide the rested dough into 8 equal portions. On a floured surface, roll each piece into a thin circle, about 8-9 inches in diameter. They should be thin but not so thin that they tear.
Heat a dry skillet or griddle over medium heat. Cook each bread circle for about 1-2 minutes on each side until you see light brown spots but they’re still soft and pliable. Don’t overcook them – they should remain flexible for wrapping.
Assembling the Frankies
This is where it gets fun. Heat a clean skillet over medium heat and brush it lightly with oil. Place one cooked bread circle in the pan.
Brush the surface with beaten egg and let it set for about 30 seconds. Then flip the bread so the egg-coated side is down.
On the plain side, spread a generous amount of green chutney. Add a portion of the chicken filling, some sliced onions, tomatoes, and a sprinkle of chat masala.
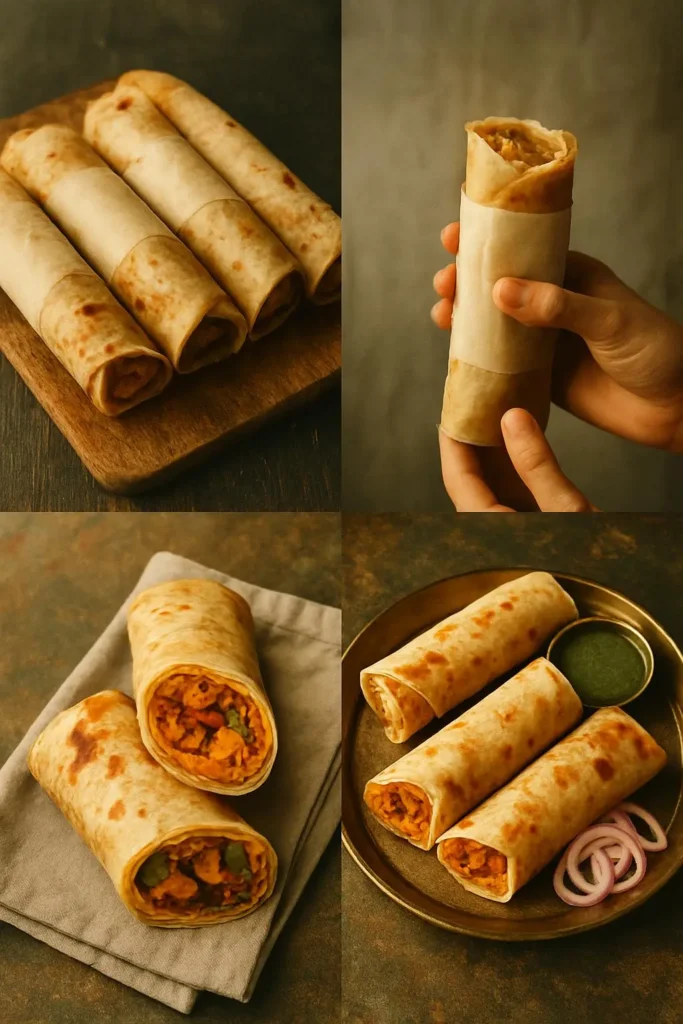
Fold the bottom edge up over the filling, then fold in the sides, and roll tightly from bottom to top. It should look like a neat package.
Cook the wrapped frankie seam-side down for 2-3 minutes until the egg coating is golden and crispy. Flip and cook for another 1-2 minutes.
Tips from My Kitchen
The dough consistency is crucial. It should be soft and pliable but not sticky. If it’s too dry, add a little more warm water. If it’s too wet, work in a bit more flour.
Don’t skip the resting time for the dough. I tried rushing this once and ended up with bread that kept shrinking back when I tried to roll it out. Patience pays off here.
Keep the cooked breads warm by wrapping them in a clean kitchen towel. This prevents them from drying out and makes them easier to wrap when you’re assembling.
The egg coating is what makes frankies special. It creates that slightly crispy exterior that contrasts beautifully with the soft interior. Don’t skip this step.
Make sure your filling isn’t too wet. If there’s excess liquid, it’ll make the bread soggy. Let the chicken mixture cool slightly before assembling.
Mistakes I’ve Made (So You Don’t Have To)
My first batch of frankies was a disaster because I rolled the dough too thick. They were more like thick pancakes than the delicate wraps they should be. Roll them thin – almost tortilla-thin.
I also used to overfill them, which made them impossible to wrap properly. Less is more when it comes to filling. You want enough to make them substantial but not so much that they burst open.
Don’t make the chicken filling too spicy if you’re serving kids or people sensitive to heat. The green chutney already adds a nice kick, so balance is key.
Serving Suggestions
Frankies are perfect as they are, but I love serving them with extra green chutney on the side for dipping. Sometimes I’ll make a simple yogurt raita with cucumber and mint to cool things down.
They’re fantastic for lunch boxes because they hold together well and taste great at room temperature. I often make a batch on Sunday and pack them for easy weekday lunches.
For a complete meal, serve them with some crispy papadums or a simple salad. The contrast of textures is really nice.
Variations to Try
Once you master the basic technique, you can experiment with different fillings. I’ve made amazing versions with:
- Paneer and vegetables for a vegetarian option
- Spiced potatoes with peas and carrots
- Egg and onion for a simple but satisfying version
- Leftover tandoori chicken for a fusion twist
You can also play with the chutney – sometimes I add a little coconut for sweetness or extra ginger for heat.
How to Store & Reheat
Frankies are best eaten fresh, but you can store assembled ones in the refrigerator for up to 2 days. Wrap them individually in foil to prevent them from drying out.
To reheat, wrap in a damp paper towel and microwave for 30-60 seconds, or warm them in a dry skillet over medium heat for 2-3 minutes per side.
The bread can be made ahead and stored in the refrigerator for up to 3 days. Just bring to room temperature before assembling.
The Bottom Line
These frankie rolls have become one of my most requested recipes, and I totally understand why. They’re interactive, flavorful, and just plain fun to eat. There’s something about wrapping your hands around a warm, spiced-filled bundle that makes any meal feel like a celebration.
The technique might seem a little involved at first, but once you get the hang of it, you’ll be cranking these out like a street vendor. And honestly, the first time you bite into a homemade frankie with that perfect balance of spiced chicken, fresh chutney, and soft bread, you’ll understand why I became so obsessed with getting this recipe right.
Don’t be intimidated by the steps – each component is actually quite simple, and the result is so much more than the sum of its parts. These frankies bring a little piece of Mumbai street food magic right to your kitchen table.

I’ve always found peace in the kitchen—it’s where I go to unwind, experiment, and reconnect. I started this blog because I wanted to share that feeling with others. My cooking journey started in a tiny apartment kitchen, with a second-hand skillet and a lot of trial and error.
Since then, I’ve learned that the best meals aren’t the most complicated—they’re the ones made with love (and maybe a little butter). Whether you’re a beginner or a kitchen pro, I hope you’ll feel right at home here.