
Cheesy Garlic Chicken Wraps That’ll Make You Forget About Takeout
You know that feeling when you’re staring into your fridge at 6 PM, wondering what magic you can pull together for dinner? That’s exactly how I discovered these cheesy garlic chicken wraps. I had some leftover rotisserie chicken, a few tortillas that were about to go stale, and a serious craving for something cheesy and comforting. What started as a “let’s just throw stuff together” moment turned into one of my family’s most requested meals.
The first time I made these, I honestly didn’t think much of it. But when my teenage son asked for seconds, then thirds, and finally said “Mom, you need to make these again tomorrow,” I knew I’d stumbled onto something special. These wraps are everything you want in a quick dinner – they’re loaded with tender chicken, melty cheese, and that irresistible garlic flavor that makes your kitchen smell like heaven.
Table of Contents
Why You’ll Love These Cheesy Garlic Chicken Wraps
Let me tell you what makes these wraps so addictive. First, they’re incredibly versatile. Got leftover chicken? Perfect. Need to use up some vegetables? Throw them in. Want to make them spicier? Easy fix. They’re like a blank canvas that always turns out delicious.
The real star here is the garlic butter mixture. I learned this trick from my mom, who used to make something similar when I was growing up. You mix softened butter with minced garlic, a pinch of Italian seasoning, and just a touch of parmesan cheese. When you spread this on the tortilla before adding your fillings, it creates this incredible flavor base that soaks into everything.
These wraps are also perfect for meal prep. I make a big batch on Sunday and wrap them individually in foil. Throughout the week, I can just grab one from the fridge and heat it up for a quick lunch or dinner. They reheat beautifully and taste just as good as when they’re fresh.
What You’ll Need
For the Garlic Butter:
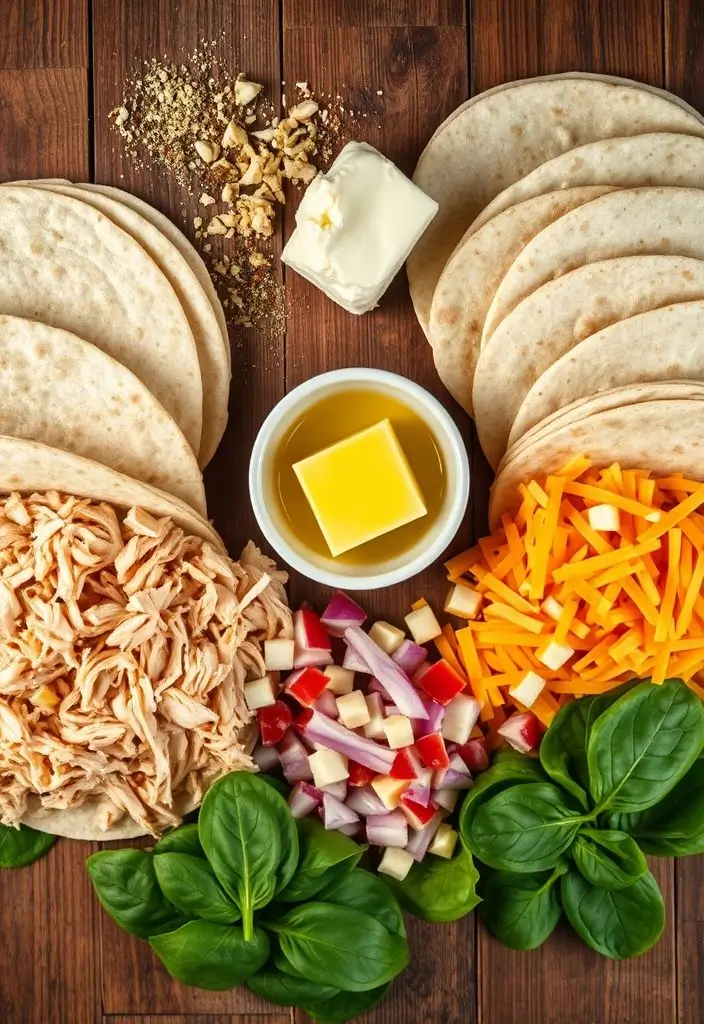
- 4 tablespoons butter, softened
- 3 cloves garlic, minced (or 1 tablespoon from a jar)
- 1/2 teaspoon Italian seasoning
- 2 tablespoons grated parmesan cheese
- Pinch of salt
For the Wraps:
- 4 large flour tortillas
- 2 cups cooked chicken, shredded or diced
- 1 1/2 cups shredded mozzarella cheese
- 1/2 cup shredded cheddar cheese
- 1/4 cup diced red onion
- 1/4 cup chopped fresh spinach or lettuce
- 2 tablespoons cream cheese, softened
- Salt and pepper to taste
Optional Add-ins:
- Diced tomatoes
- Sliced mushrooms
- Bell peppers
- Jalapeños for heat
Let me break down some of these ingredients because I’ve learned a few things over the years. For the chicken, rotisserie chicken is your best friend here. It’s already seasoned and super tender. If you’re cooking chicken from scratch, season it well with salt, pepper, and garlic powder. I’ve also used leftover grilled chicken, and it works beautifully.
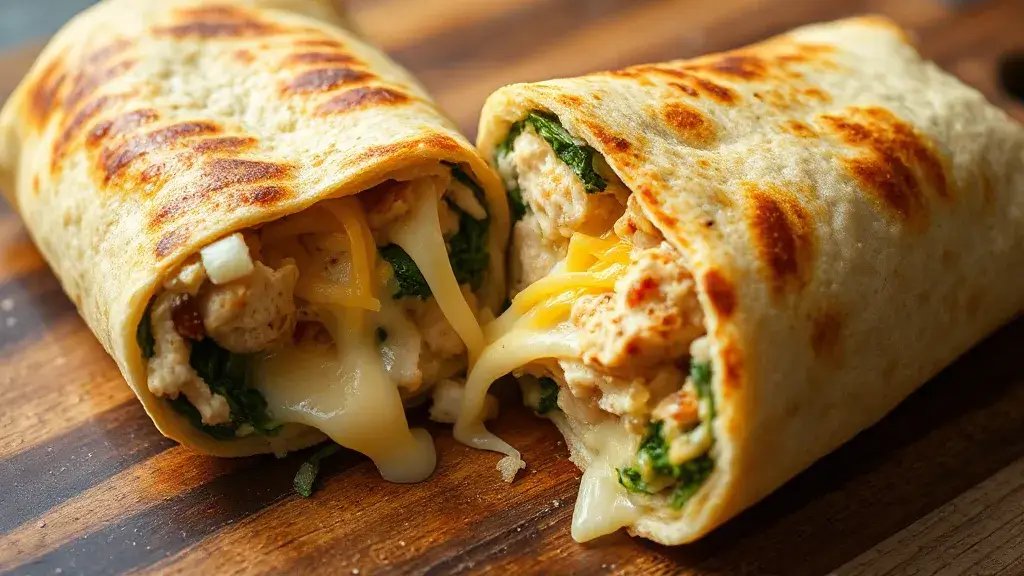
The cheese combination is crucial. Mozzarella gives you that gorgeous cheese pull, while cheddar adds sharp flavor. Don’t skip the cream cheese – it might seem weird, but it creates this creamy texture that holds everything together and prevents the wraps from getting soggy.
Let’s Make These Wraps
Step 1: Make the Garlic Butter
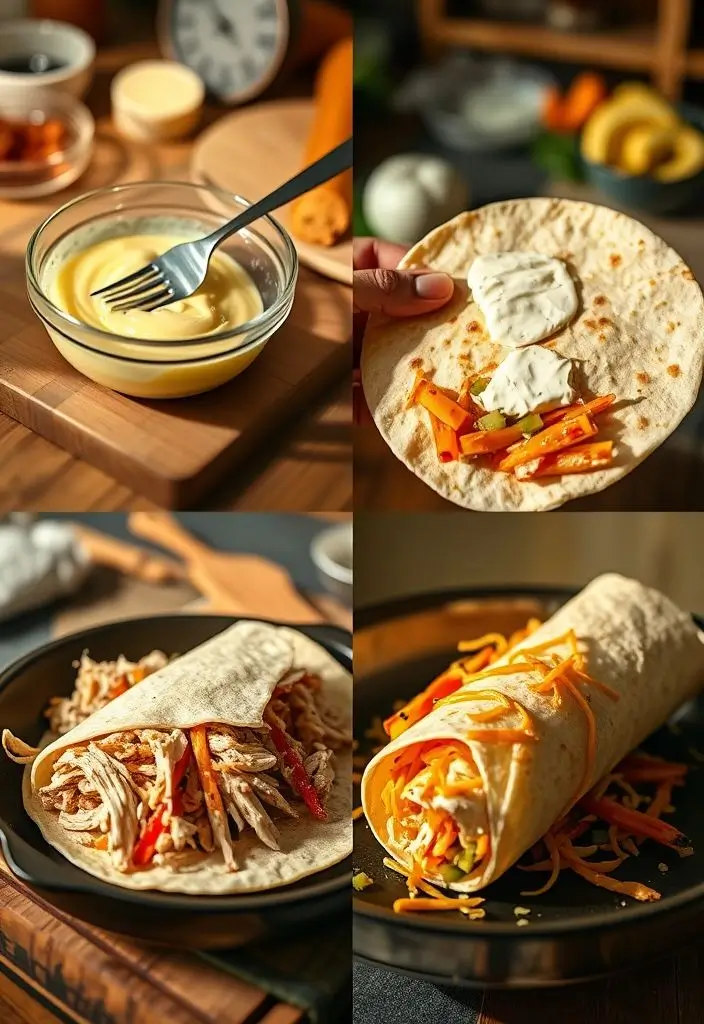
Start by mixing your softened butter with minced garlic, Italian seasoning, parmesan, and a pinch of salt. I use a fork to mash everything together until it’s well combined. The mixture should be smooth and spreadable. If your butter is too cold, just microwave it for about 10 seconds to soften it up.
Step 2: Prep Your Chicken
If you’re using rotisserie chicken, shred it into bite-sized pieces. I like to remove any skin and just use the meat. Season it lightly with salt and pepper. If your chicken seems dry, you can add a tablespoon of the garlic butter mixture to it and toss it together.
Step 3: Warm the Tortillas
This step makes such a difference. Warm your tortillas in the microwave for about 30 seconds, or heat them in a dry skillet for a few seconds on each side. Warm tortillas are easier to work with and they taste so much better.
Step 4: Assemble the Wraps
Lay each tortilla flat and spread about a tablespoon of the garlic butter mixture across the center, leaving about an inch border on all sides. Next, spread a thin layer of cream cheese over the garlic butter. This creates a moisture barrier that keeps your wrap from getting soggy.
Now for the fun part – add your fillings. Start with the chicken, then sprinkle both cheeses generously over the top. Add your onions, spinach, and any other vegetables you’re using. Don’t overstuff them – I learned this the hard way when my first attempts looked like they were ready to explode.
Step 5: Roll and Seal
Here’s my technique for the perfect wrap: fold in the sides first, then roll tightly from the bottom. The cream cheese and garlic butter will help seal everything together. Roll it snugly, but don’t squeeze too hard or you’ll push all the filling out.
Step 6: Cook the Wraps
Heat a large skillet over medium heat. You don’t need oil because the garlic butter will create enough fat. Place the wraps seam-side down and cook for 2-3 minutes until golden brown. Flip carefully and cook another 2-3 minutes until the other side is golden and the cheese is melted.
Tips from My Kitchen
Get the Heat Right: Medium heat is key here. Too high and you’ll burn the outside before the cheese melts. Too low and they’ll get soggy instead of crispy.
Don’t Skip the Garlic Butter: I tried making these without it once to save time, and they were just okay. The garlic butter is what transforms these from basic wraps to something special.
Make Them Ahead: You can assemble these wraps in the morning and cook them for dinner. Just wrap them tightly in plastic wrap and refrigerate. They’ll actually hold together better after resting.
Leftover Magic: These are perfect for using up leftover chicken, but I’ve also made them with leftover turkey, pulled pork, and even taco meat. The garlic butter base works with almost anything.
Size Matters: Use large tortillas – the burrito-size ones work best. Smaller tortillas don’t give you enough room for all the good stuff.
Serving Suggestions
These wraps are pretty complete on their own, but I love serving them with a simple side salad or some crispy roasted vegetables. They’re also fantastic with a bowl of tomato soup for dipping – it reminds me of grilled cheese and tomato soup, but way more exciting.
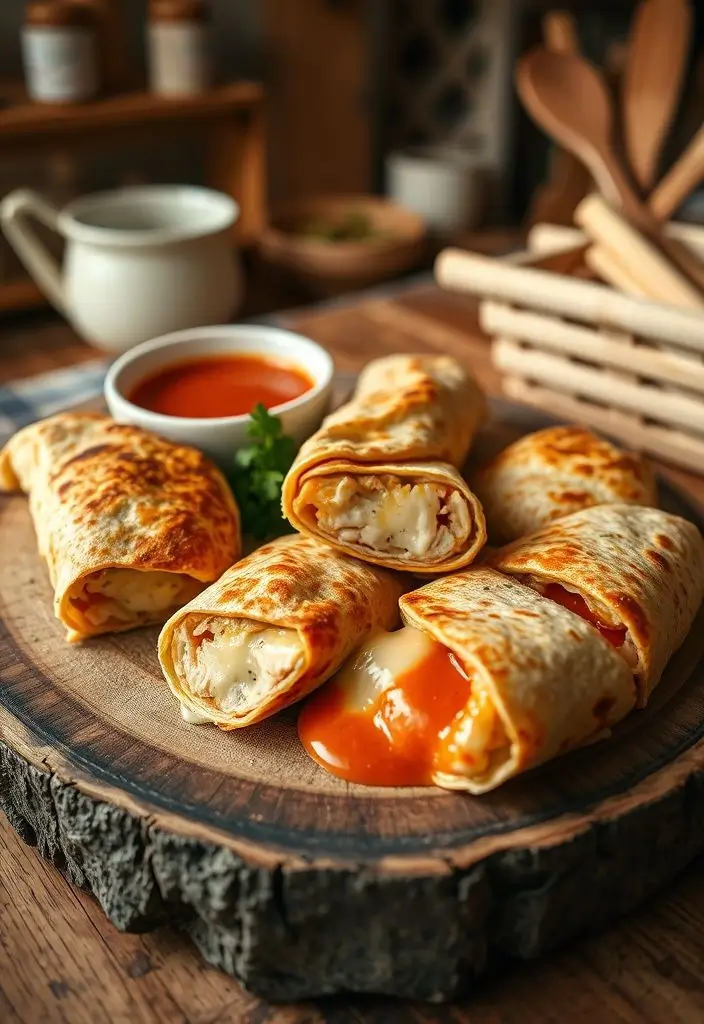
For a fun twist, try cutting the wraps diagonally and serving them as appetizers at your next party. They look fancy but are so easy to make. I’ve done this for game day, and they disappear faster than any chicken wing.
How to Store and Reheat
Refrigerator: Cooked wraps will keep in the fridge for up to 3 days. Wrap them individually in foil or plastic wrap to prevent them from drying out.
Freezer: These freeze surprisingly well. Wrap them tightly in plastic wrap, then in foil, and they’ll keep for up to 3 months. Let them thaw in the fridge overnight before reheating.
Reheating: The best way to reheat these is in a skillet over medium-low heat. It takes about 3-4 minutes per side and gets them crispy again. You can also use a toaster oven at 350°F for about 5 minutes. Avoid the microwave if possible – it makes them soggy.
Make It Your Own
One of the things I love most about these wraps is how customizable they are. My daughter likes to add diced tomatoes and extra spinach to make them feel healthier. My husband always asks for jalapeños to spice things up. I’ve made them with different cheeses – pepper jack is amazing if you like heat, and swiss gives them a more sophisticated flavor.
During the summer, I sometimes add fresh basil and cherry tomatoes from our garden. In the fall, I’ve even added some roasted butternut squash. The garlic butter base is so versatile that it works with almost any combination you can think of.
The beauty of this recipe is that it’s really more of a technique than a strict formula. Once you get the hang of making the garlic butter and rolling the wraps properly, you can experiment with whatever you have on hand. It’s become one of those go-to meals that I can make without even thinking about it, and somehow it always turns out delicious.
These cheesy garlic chicken wraps have saved me from countless “what’s for dinner” moments, and I hope they do the same for you. They’re comfort food at its finest – warm, cheesy, garlicky, and satisfying in all the right ways.

I’ve always found peace in the kitchen—it’s where I go to unwind, experiment, and reconnect. I started this blog because I wanted to share that feeling with others. My cooking journey started in a tiny apartment kitchen, with a second-hand skillet and a lot of trial and error.
Since then, I’ve learned that the best meals aren’t the most complicated—they’re the ones made with love (and maybe a little butter). Whether you’re a beginner or a kitchen pro, I hope you’ll feel right at home here.