
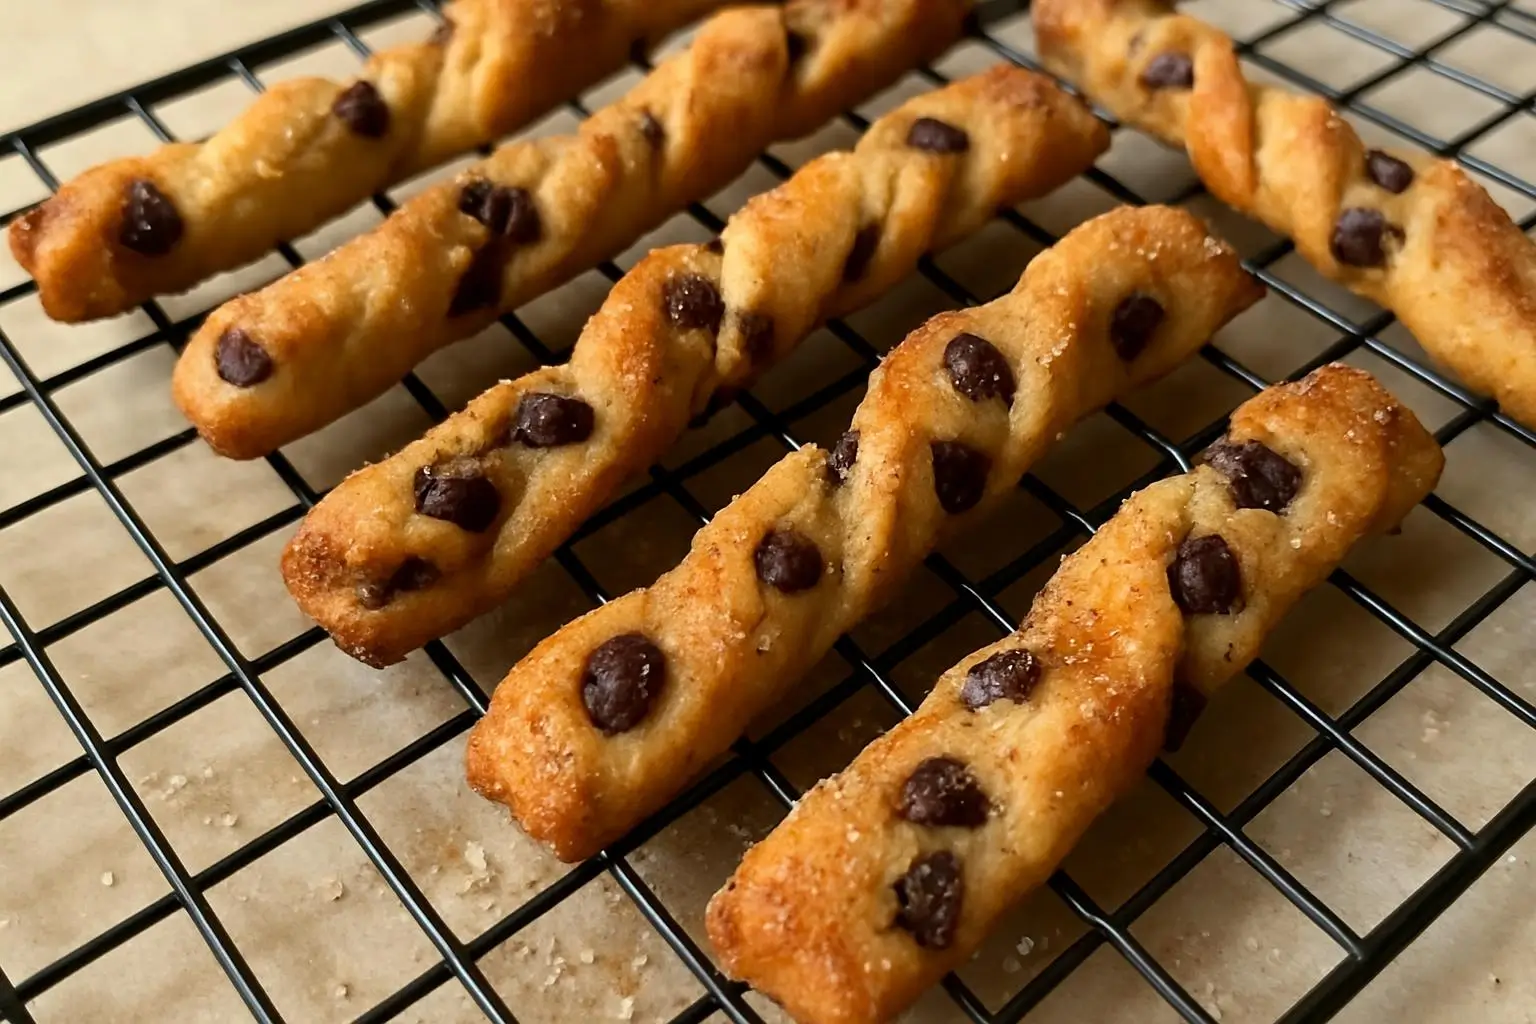
Chocolate Chip Cookie Dough Twists Recipe
Look, I’m gonna be honest with you – this recipe happened because I got lazy. And sometimes the best recipes come from pure laziness mixed with a weird craving and whatever’s left in your pantry.
It was one of those Saturday afternoons where I promised the kids we’d bake cookies for dessert, but then I remembered I hate rolling out individual cookie dough balls. Like, genuinely hate it. All that scooping and spacing and trying to make them the same size? Nope. My back hurts just thinking about it.
So I’m staring at this bowl of cookie dough thinking “what if I just… didn’t?” What if I turned it into something that looked fancy but was actually way easier? And that’s how these twists were born. Pure maternal laziness disguised as creativity.
Table of Contents
The Accidental Discovery (My Kitchen Chaos Story)
First time I made these, I was actually trying to make cinnamon rolls but realized halfway through that I’d started with cookie dough instead of bread dough. Don’t ask me how that happened – I was probably watching Netflix while measuring ingredients.
My 9-year-old walked into the kitchen and goes “Mom, why does your cinnamon roll dough have chocolate chips?” And I’m standing there like… well, now what? Do I start over or just see what happens?
Obviously, I saw what happens. Because starting over is for people who have unlimited time and patience, and I am neither of those people.
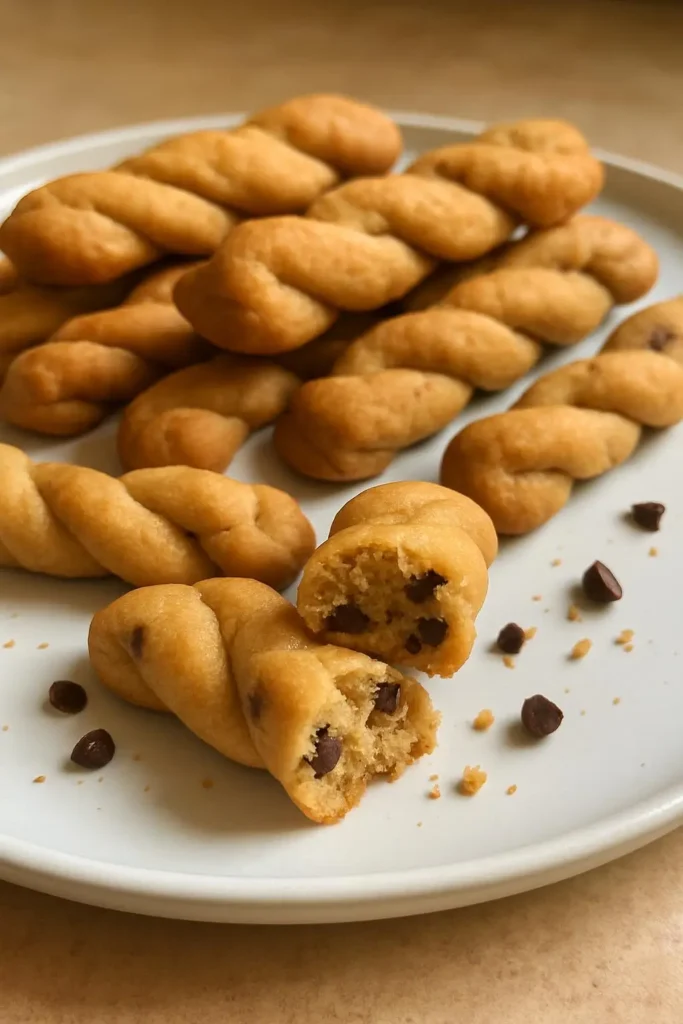
Turned out, “what happens” is magic. These twists are like if a chocolate chip cookie and a soft pretzel had a baby, and that baby was raised by cinnamon rolls. Weird description, I know, but trust me on this.
What You’ll Need (And My Shopping Disasters)
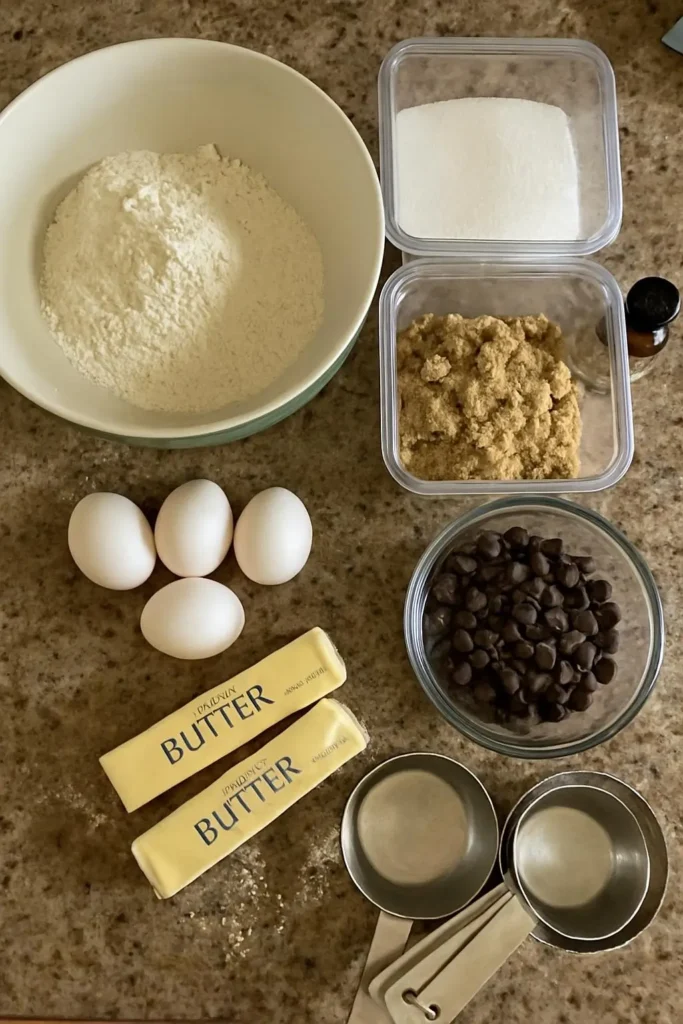
For the Dough:
- 2 1/4 cups all-purpose flour
- 1 teaspoon baking soda
- 1 teaspoon salt
- 1 cup butter, softened (not melted, learned this the hard way)
- 3/4 cup granulated sugar
- 3/4 cup packed brown sugar
- 2 large eggs
- 2 teaspoons vanilla extract
- 1 1/2 cups mini chocolate chips (regular size works too, but mini distributes better)
For the Topping:
- 1/4 cup melted butter
- 1/4 cup granulated sugar mixed with 1 teaspoon cinnamon
- Extra chocolate chips for sprinkling (because more is always better)
About that butter – it needs to be actually soft, not rock hard from the fridge that you tried to soften in the microwave and accidentally melted half of. Been there, done that, made butter soup. Room temperature means you can press your finger into it without breaking your nail.
And please, for the love of all that’s good, don’t buy store-brand chocolate chips if you can help it. I did that once to save like 50 cents and everyone noticed. My neighbor asked if I was “going through something financially.” Embarrassing.
The Method (Easier Than Regular Cookies, I Promise)
Step 1: Preheat your oven to 375°F. Line two baking sheets with parchment paper. Don’t skip the parchment – these can stick like nobody’s business.
Step 2: Mix your dry ingredients in a bowl. Flour, baking soda, salt. Whisk it around so it looks uniform and professional, even though we both know this is anything but professional.
Step 3: In your stand mixer (or with a hand mixer if you’re into arm workouts), cream the butter and both sugars until it’s fluffy. Like, actually fluffy, not just mixed. This takes longer than you think – maybe 3-4 minutes. I usually use this time to clean up because I’m a mess when I bake.
Step 4: Beat in eggs one at a time, then the vanilla. The dough might look a little weird after the eggs – lumpy and separated. Don’t panic. It comes together.
Step 5: Slowly mix in the flour mixture until just combined. Don’t overmix or you’ll end up with tough twists instead of tender ones. Then fold in those chocolate chips.
Now here’s where it gets fun…
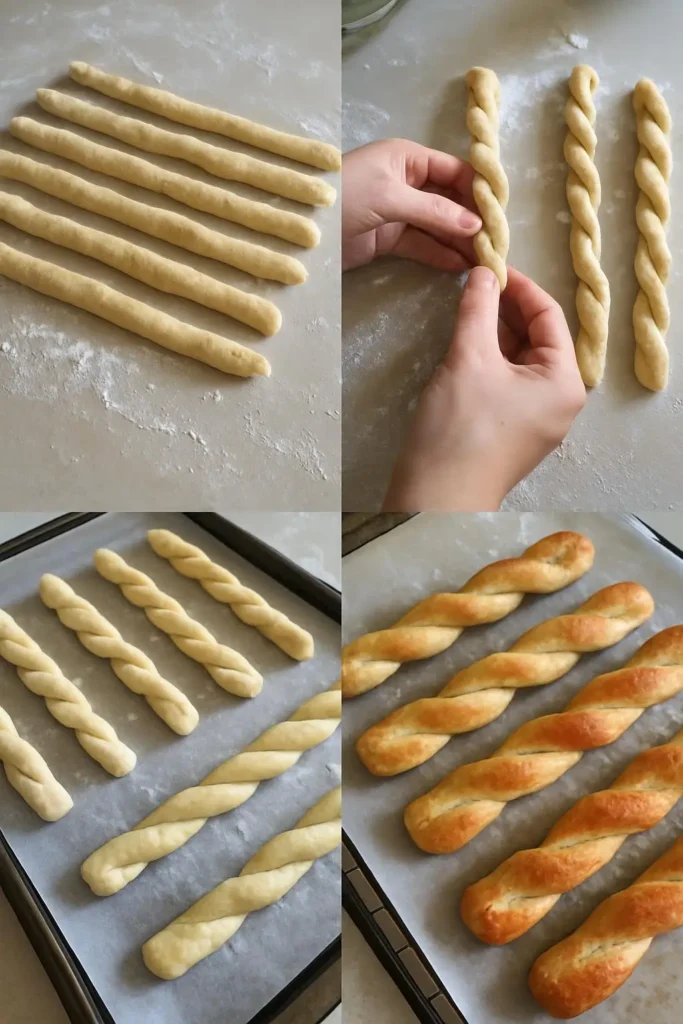
Step 6: Instead of scooping individual cookies, divide the dough into about 16 pieces. I just eyeball this – some are bigger, some smaller, life’s too short to weigh cookie dough.
Step 7: Roll each piece into a rope about 8 inches long. This is where kids can help if they promise not to eat all the chocolate chips first. Twist each rope into whatever shape makes you happy – spirals, pretzels, figure eights, abstract art. There are no rules here.
Step 8: Place on your parchment-lined baking sheets, leaving some space between them because they do spread a little.
Step 9: Brush with melted butter (be generous, life’s short), then sprinkle with that cinnamon sugar mixture. Add extra chocolate chips on top because why not?
Step 10: Bake for 10-12 minutes until the edges are set and lightly golden. They might look slightly underbaked in the center – that’s perfect. They’ll finish cooking on the hot pan.
Things I Learned Through Trial and Error
Don’t make the ropes too thin or they’ll break when you twist them. Ask me how I know this. Actually, don’t – it involved a lot of muttering under my breath and my teenager asking if I needed a hug.
Also, these are best eaten slightly warm. Like, fresh-from-the-oven warm when the chocolate chips are still melty and the outside is crispy but the inside is soft. Room temperature they’re still good, but warm they’re transcendent.
If your dough is too sticky to roll, chill it for 30 minutes. If it’s too dry and cracking, you probably overmixed or your butter wasn’t soft enough. Live and learn.
Family Reactions (The Real Test)
My husband, who usually just nods and says “good” at whatever I bake, actually stopped mid-bite and said “What ARE these?” in that tone that means he’s impressed. Then he ate four more while I wasn’t looking.
The kids fought over them. Actual fighting. I had to make a rule about taking turns, which is ridiculous because they’re just cookies, but apparently they’re really good cookies.
My mother-in-law, who’s never met a baked good she couldn’t critique, asked for the recipe. Twice. I consider this my greatest baking victory to date.
Why These Work Better Than Regular Cookies
First off, no scooping individual cookies means no sore arms and no uneven sizing. Everything bakes more evenly because you’re not trying to make perfect little mounds.
Second, the twisting creates all these nooks and crannies where the cinnamon sugar gets trapped, so every bite has texture and flavor variation. It’s like built-in interest.
Third, they look way fancier than they are. People think you spent ages shaping them individually when really you just rolled some dough and twisted it. Maximum impact, minimum effort.
Variations (Because I Can’t Help Myself)
Sometimes I add a handful of chopped pecans to the dough. Gives it a nice crunch and makes me feel like I’m adding something healthy. (I’m not, but feelings matter.)
White chocolate chips instead of regular ones make them feel more elegant. Good for when you want to pretend you’re sophisticated.
A pinch of espresso powder in the dough makes the chocolate flavor more intense. Very grown-up, very “I know what I’m doing in the kitchen” even when you absolutely don’t.
Storage and Gift-Giving
These keep for about a week in an airtight container, but good luck making them last that long. They also freeze beautifully if you want to make ahead for a party or just hide some from your family.
For gifts, I put them in those clear bags tied with ribbon. They look homemade but intentional, if that makes sense. Like you planned to make something beautiful instead of just winging it with leftover cookie dough.
The Real Talk Section
Are these healthier than regular cookies? Absolutely not. Are they easier to make? Definitely. Do they taste like you spent way more time on them than you actually did? 100%.
They’re not going to win any fancy baking contests, but they will make your kitchen smell amazing and your family think you’re some kind of domestic goddess. Sometimes that’s exactly what you need.
Why I Keep Making These
Honestly? Because they’re foolproof and impressive at the same time. I can make them when I’m tired, distracted, or when three kids are asking me seventeen different questions while I’m measuring flour.
They satisfy that need to make something special without actually being complicated. And in a world where everything feels complicated these days, that’s worth something.
Plus, watching people’s faces when they bite into one never gets old. There’s this moment of surprise, like they weren’t expecting something twisted cookie dough to be so good. I live for those moments.
Make these. Seriously. Your family will thank you, your neighbors will be jealous, and you’ll feel like you accomplished something creative even though you basically just played with cookie dough for twenty minutes.
And if anyone asks how you came up with such a clever idea, just smile mysteriously and change the subject. Let them think you’re a baking genius. We both know the truth, but that can be our secret.
Now excuse me while I go make another batch because thinking about them made me crave that perfect combination of crispy edges and soft centers with pockets of melty chocolate and cinnamon sugar.
Happy baking! 🍪
Easy Christmas Pecan Turtles
Simple 3-ingredient Christmas pecan turtle candies with caramel and chocolate. No candy thermometer required - these homemade treats taste like expensive candy shop turtles but are incredibly easy to make at home.
Ingredients
- 2 cups pecan halves
- 1 bag (14 oz) caramel bits or soft caramels
- 12 oz semi-sweet or milk chocolate chips
- 2 tablespoons heavy cream or milk
- 1 teaspoon vanilla extract (optional)
- Sea salt for sprinkling (optional)
Instructions
-
Step 1Line baking sheets with parchment paper. Arrange pecan halves in clusters of 3-4 pecans each, touching but not overlapping, to form turtle shapes.
-
Step 2Place caramel bits and cream in microwave-safe bowl. Microwave in 30-second intervals, stirring between each, until smooth and melted (about 2 minutes total).
-
Step 3Working quickly, spoon about 1 tablespoon of melted caramel over each pecan cluster, covering most of the pecans.
-
Step 4Let caramel set for 15 minutes until firm but still slightly soft.
-
Step 5Melt chocolate chips in microwave using 30-second intervals, stirring constantly until smooth. Add vanilla if using.
-
Step 6Spoon about 1 tablespoon of melted chocolate over each caramel-covered cluster.
-
Step 7Sprinkle lightly with sea salt while chocolate is still wet, if desired.
-
Step 8Let set at room temperature for 30 minutes or refrigerate for 15 minutes until chocolate is firm.

I’ve always found peace in the kitchen—it’s where I go to unwind, experiment, and reconnect. I started this blog because I wanted to share that feeling with others. My cooking journey started in a tiny apartment kitchen, with a second-hand skillet and a lot of trial and error.
Since then, I’ve learned that the best meals aren’t the most complicated—they’re the ones made with love (and maybe a little butter). Whether you’re a beginner or a kitchen pro, I hope you’ll feel right at home here.
Thank You for this