
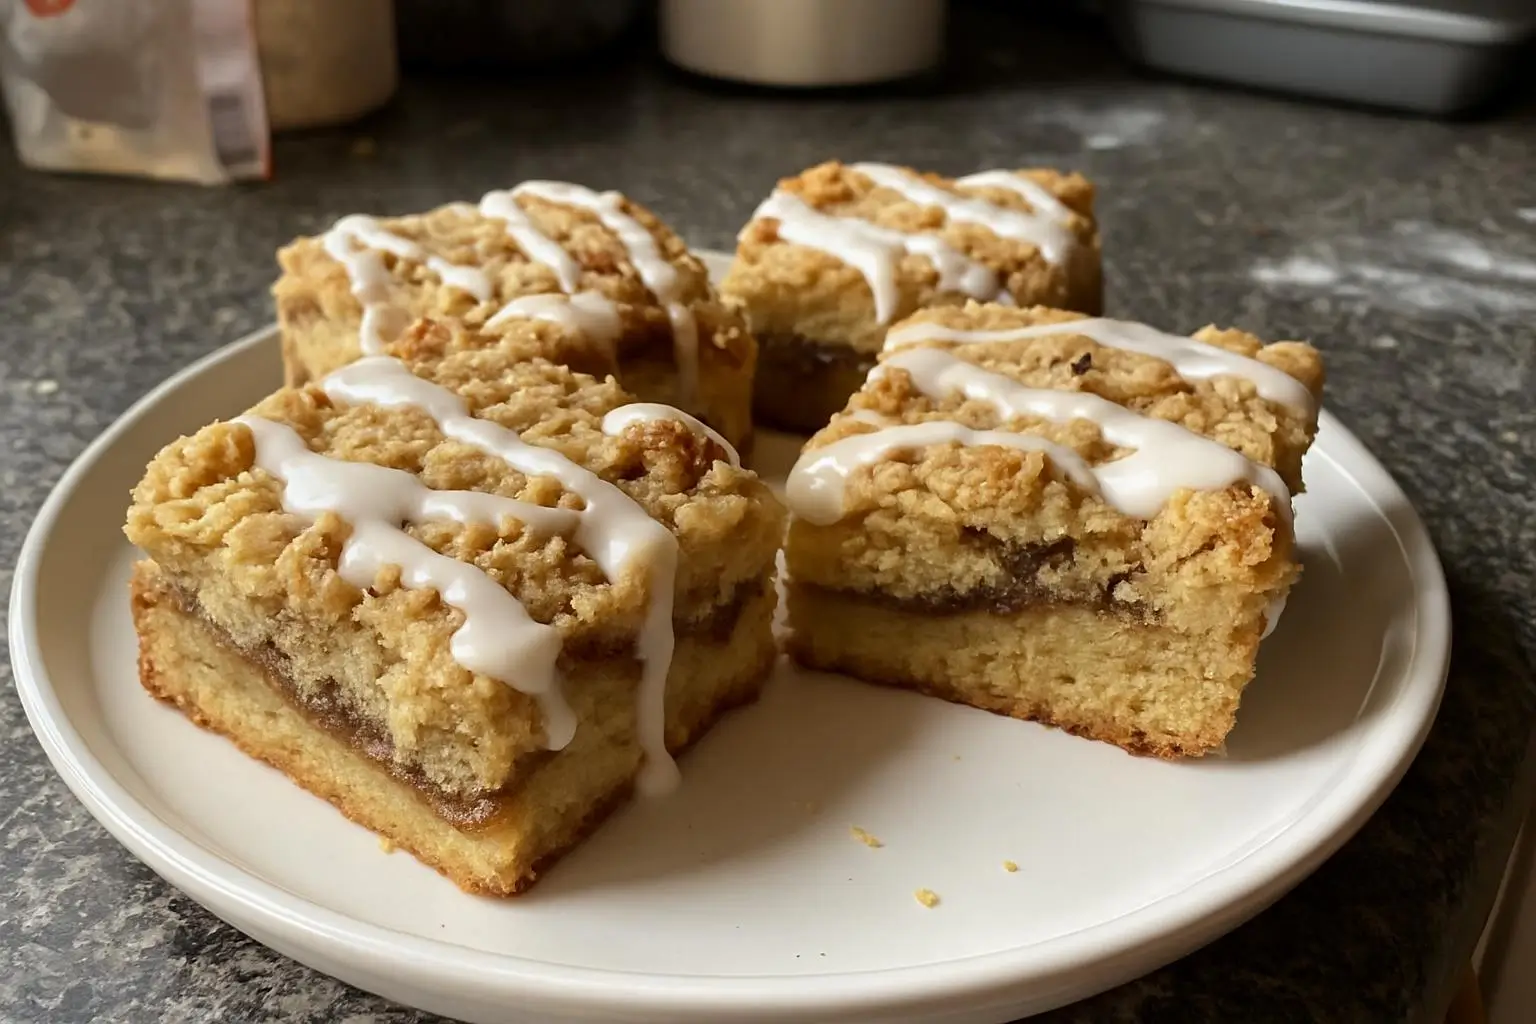
Delightful Cinnamon Roll Bliss Bars Recipe
Okay, so I messed this up three times before getting it right. And honestly? I’m still not sure if it was luck or if I finally figured out what I was doing wrong. But everyone keeps asking for this recipe, so here goes nothing.
Look, I’m gonna be honest with you – I never planned to make these bars. It was one of those Sunday afternoons where I was craving cinnamon rolls but absolutely did NOT want to deal with all that yeast business. You know what I mean? The waiting, the rising, the potential for complete disaster when the dough doesn’t cooperate. Been there, done that, cried over failed dough.
So I’m standing in my kitchen, wearing my lucky apron (the one with the coffee stain that won’t come out no matter what I try), and I just started throwing ingredients together. This was back when everyone was making banana bread during lockdown, but I was so over bananas by then.
Table of Contents
The Story Behind These Bars (Messy & Real)
I think the inspiration came from my neighbor Sarah… or maybe it was something I saw on Pinterest at 2 AM when I couldn’t sleep? Honestly can’t remember. What I DO remember is that first attempt. Disaster. Complete disaster. The filling sank to the bottom, the top was burnt, and my 8-year-old took one bite and made a face like I’d served him Brussels sprouts.
But here’s the thing – the flavor was there. It tasted exactly like cinnamon rolls, just… structurally challenged. So I kept tweaking it. Second attempt was better but still too dense. Third time I accidentally used salted butter instead of unsalted (don’t ask how I managed that), and it was weirdly too salty but also somehow more interesting?
Fourth time was the charm. And now my family won’t let me make regular cinnamon rolls anymore because these are “easier and taste the same.” Thanks, guys.
What You’ll Need (And My Shopping Stories)
For the Base:
- 2 cups all-purpose flour
- 1/2 cup granulated sugar
- 1/2 cup brown sugar (I always use the chunky kind, not that weird smooth stuff)
- 1 teaspoon baking powder
- 1/2 teaspoon salt
- 1/2 cup unsalted butter, cold and cubed
- 1 large egg
- 1/2 cup whole milk (don’t use skim, trust me on this one)
For the Cinnamon Swirl (The Good Stuff):
- 1/2 cup butter, softened (learned this the hard way – it needs to be SOFT)
- 1/2 cup brown sugar
- 2 tablespoons ground cinnamon
- 1 tablespoon all-purpose flour
For the Glaze:
- 1 cup powdered sugar
- 3-4 tablespoons milk
- 1 teaspoon vanilla extract
- Pinch of salt (seriously, don’t skip this)
Good luck finding decent butter this time of year that’s actually soft when you need it. I’ve started taking mine out the night before because I’m tired of trying to soften it in the microwave and ending up with butter soup.
Oh, and about the cinnamon – don’t use the stuff that’s been sitting in your spice cabinet since 2019. I did that once and wondered why everything tasted like cardboard. Get fresh cinnamon. Your taste buds will thank you.
The Instructions (Real Kitchen Talk)
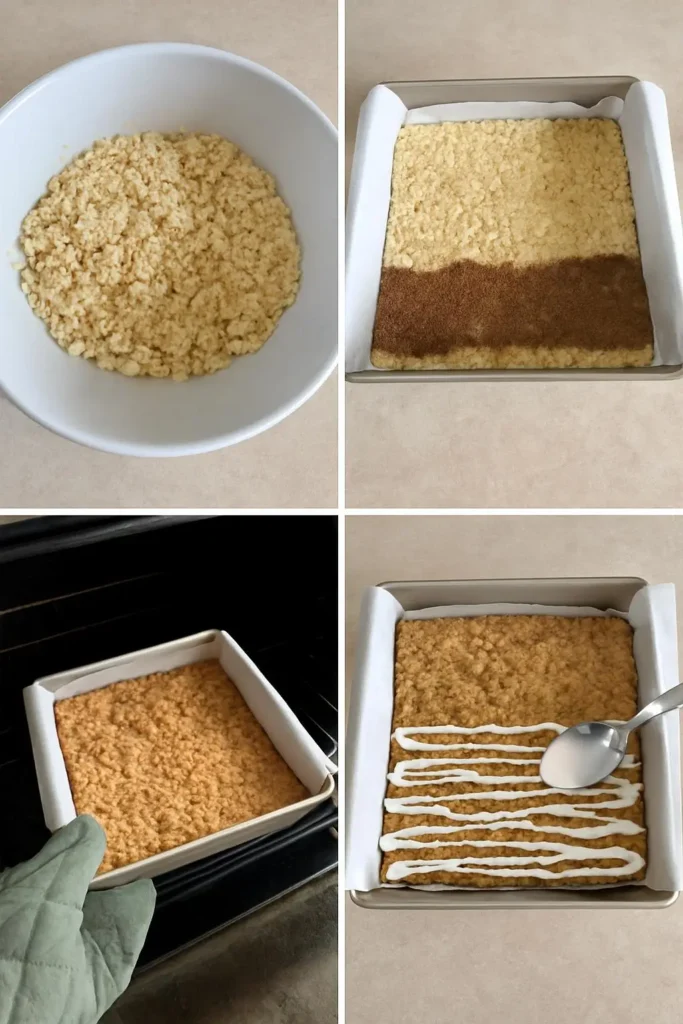
Step 1: Preheat your oven to 350°F. Grease a 9×13 inch pan. And by grease, I mean really grease it. Use butter, cooking spray, whatever. I learned this lesson when half my first batch stuck to the pan and I had to serve “rustic” pieces.
Step 2: Mix all the base ingredients except the wet stuff in a large bowl. So flour, both sugars, baking powder, salt. Whisk it around until it looks uniform.
Step 3: Add those cold butter cubes and… okay, here’s where it gets messy. You need to cut the butter into the flour mixture until it looks like coarse crumbs. I use a pastry cutter, but honestly? Sometimes I just use my hands. Don’t tell the cooking police.
Step 4: Beat the egg and milk together, then pour into the flour mixture. Stir just until combined – it’ll look shaggy and weird. That’s normal. Don’t panic like I did the first time.
Step 5: Press about 2/3 of this mixture into your prepared pan. It’s gonna seem thin and you’ll think you’re doing it wrong. You’re not. Trust the process.
Now here’s where the magic happens…
Step 6: Mix together all your cinnamon swirl ingredients. The butter needs to be soft enough that you can spread it, but not so soft it’s melting. It should look like… well, like cinnamon butter. Spread this over your base layer.
Step 7: Crumble the remaining dough mixture over the top. Some pieces will be big, some small. It’s supposed to look rustic. Or at least that’s what I tell myself when it looks like a hot mess.
Step 8: Bake for 25-30 minutes until the top is golden brown. Set a timer because I ALWAYS forget and then panic when I smell something. It should look set but not dried out.
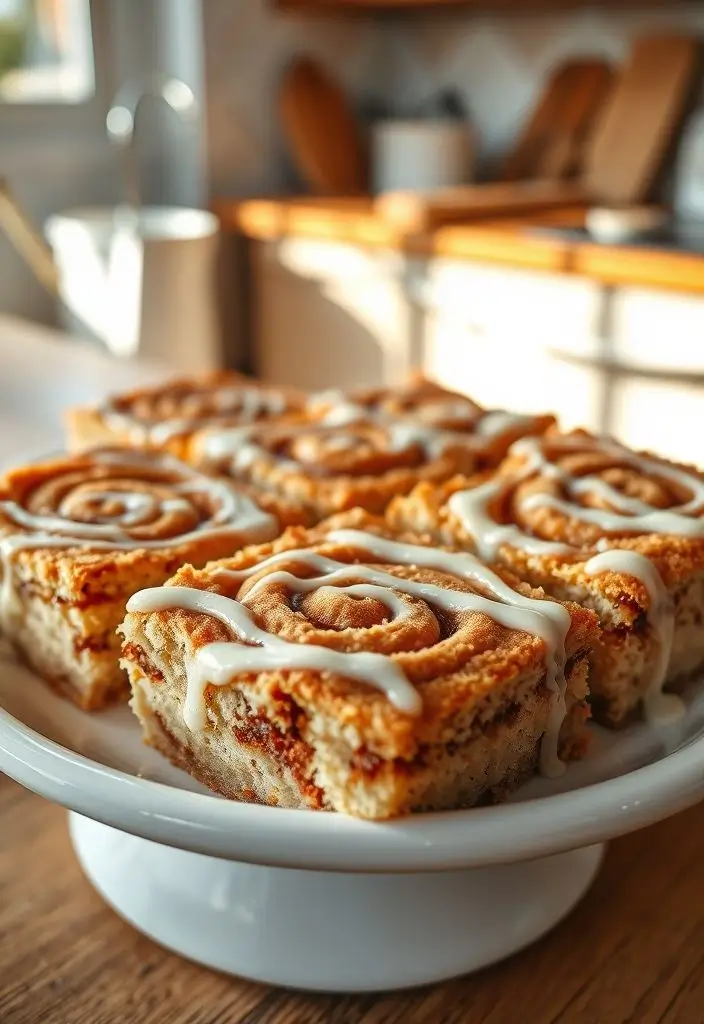
Actually, you know what? Let me interrupt myself here. The key is—oh wait, I forgot to mention—you need to let these cool completely before cutting. I know, I know, it’s torture. But if you cut them warm, they’ll fall apart and you’ll have delicious cinnamon roll mush instead of bars.
The Glaze Situation
While those bars are cooling (and driving you crazy with how good they smell), make your glaze. Whisk together the powdered sugar, milk, vanilla, and that pinch of salt. Start with 3 tablespoons of milk and add more if needed. You want it thick enough to stay put but thin enough to drizzle.
I always make too much glaze because I’m obsessed with it, but somehow there’s never any left over. My family has been known to eat spoonfuls of it straight. Not proud of this, but not sorry either.
My Random Discoveries and Tips
Found out by accident that adding a splash of coffee to the glaze makes everything better. Don’t ask me why, but it adds this depth that makes people think you’re some kind of baking genius.
Also, these freeze amazingly well. Cut them into squares, wrap individually in plastic wrap, and freeze. Perfect for when you need to bring something to a potluck and forgot until the morning of. Been there.
Oh, and another thing – don’t use a whisk for mixing the base dough. Trust me. A spoon or wooden spoon works way better. Found this out when I spent ten minutes trying to get dough out of whisk wires.
My neighbor’s kid (the one who’s allergic to everything) can actually eat these, which shocked everyone. But always check your ingredients if you’re dealing with allergies. I’m not a doctor, just someone who bakes too much.
What Went Wrong (So You Don’t Have To)
Version 1.0 was basically cardboard because I overmixed the dough. Don’t do what I did and treat it like cookie dough that needs to be perfectly smooth.
Version 2.0 had the filling sink to the bottom because I used melted butter instead of softened. The butter needs to hold its shape, not disappear into the dough.
Version 3.0 (the salty butter incident) actually taught me that a tiny bit of salt in sweet things makes them taste more… sweet? It’s weird but it works.
Serving These Things
Kids eat these with their hands, obviously. Adults pretend to be civilized and use forks until no one’s looking. They’re perfect with coffee in the morning, tea in the afternoon, or honestly just whenever you want something that tastes like a hug.
I’ve served these at book club, brought them to work, and made them for every single potluck I’ve been invited to in the past two years. People literally ask me to bring “those cinnamon things” now.
They’re way better than the coffee shop version (fight me on this), and definitely better than those refrigerated cinnamon roll tubes. Plus, you don’t have that weird pop when you open the container that makes everyone in the kitchen jump.
The Real Talk Section
This isn’t fancy food. It’s not Instagram-worthy unless you’re really good at styling food, which I’m not. But it’s good, and it makes your house smell like a bakery, and sometimes that’s exactly what you need.
Are they healthy? Absolutely not. Do I care? Also no. Life’s too short to eat sad desserts.
Will they impress people? Yeah, probably, but mainly because they taste like you spent way more time on them than you actually did. And honestly, isn’t that the best kind of recipe?
Final Thoughts
If you’re still reading this, you either really want cinnamon rolls or you’re as obsessed with rambling recipe stories as I am. Either way, I like you already.
Make these bars. Seriously. They’re foolproof (if I can make them without burning down my kitchen, anyone can), they taste amazing, and they’ll make you look like you know what you’re doing in the kitchen even if you absolutely don’t.
Let me know how yours turn out! And if you mess them up the first time, don’t worry. I messed up THREE times before getting it right. Sometimes cooking is just about persistence and good luck.
Now I’m craving these again. Thanks a lot, brain.
Happy baking! 🥧
Delightful Cinnamon Roll Bliss Bars
Easy cinnamon roll bars that taste just like fresh cinnamon rolls but without the yeast and waiting time. These delightful bars feature a crumbly base, cinnamon swirl filling, and sweet glaze - perfect for breakfast, dessert, or any time you're craving cinnamon roll flavor.
Ingredients
- 2 cups all-purpose flour
- 1/2 cup granulated sugar
- 1/2 cup brown sugar
- 1 teaspoon baking powder
- 1/2 teaspoon salt
- 1/2 cup unsalted butter, cold and cubed
- 1 large egg
- 1/2 cup whole milk
- 1/2 cup butter, softened
- 1/2 cup brown sugar (for filling)
- 2 tablespoons ground cinnamon
- 1 tablespoon all-purpose flour (for filling)
- 1 cup powdered sugar
- 3-4 tablespoons milk (for glaze)
- 1 teaspoon vanilla extract
- Pinch of salt (for glaze)
Instructions
-
Step 1Preheat oven to 350°F (175°C). Grease a 9x13 inch baking pan thoroughly.
-
Step 2In a large bowl, whisk together flour, granulated sugar, brown sugar, baking powder, and salt.
-
Step 3Cut cold butter cubes into the flour mixture using a pastry cutter or your hands until mixture resembles coarse crumbs.
-
Step 4Beat egg and milk together, then stir into flour mixture just until combined (mixture will look shaggy).
-
Step 5Press 2/3 of the dough mixture into the prepared baking pan.
-
Step 6For cinnamon filling, mix softened butter, brown sugar, cinnamon, and flour until combined. Spread over the base layer.
-
Step 7Crumble remaining dough mixture over the cinnamon layer.
-
Step 8Bake for 25-30 minutes until top is golden brown and set.
-
Step 9Cool completely in pan before cutting into bars.
-
Step 10For glaze, whisk together powdered sugar, milk, vanilla, and salt. Drizzle over cooled bars before serving.

I’ve always found peace in the kitchen—it’s where I go to unwind, experiment, and reconnect. I started this blog because I wanted to share that feeling with others. My cooking journey started in a tiny apartment kitchen, with a second-hand skillet and a lot of trial and error.
Since then, I’ve learned that the best meals aren’t the most complicated—they’re the ones made with love (and maybe a little butter). Whether you’re a beginner or a kitchen pro, I hope you’ll feel right at home here.