
Dairy Free Chocolate Pumpkin Butter Cups That Actually Don’t Suck
Okay, so I’ve been trying to nail this recipe for about three months now. And let me tell you, the first two attempts were… well, let’s just say my dog wouldn’t even touch them. But I finally figured it out, and now my neighbor keeps “accidentally” stopping by around dessert time.
Look, I’m gonna be honest with you. I started making these because my sister went dairy-free last year and I was tired of watching her eat sad store-bought alternatives that taste like cardboard. Plus, it’s fall, and if you’re not putting pumpkin in everything, are you even trying?
Table of Contents
The Backstory (Because Why Not)
This whole thing started when I was scrolling Pinterest at 2 AM (don’t judge), and I saw this gorgeous photo of pumpkin butter cups. But of course, the recipe was buried behind seventeen ads and a novel-length story about someone’s childhood. Anyway, I tried their version and… disaster. Complete disaster.
The chocolate was grainy, the pumpkin filling was basically baby food, and they stuck to the paper liners like they’d been super-glued. My kitchen looked like a crime scene, and I’m pretty sure I used every bowl I own.
But here’s the thing—I’m stubborn. My mom always said it would get me in trouble, and she was right about most things, but this time it actually worked out.
What You’re Getting Into
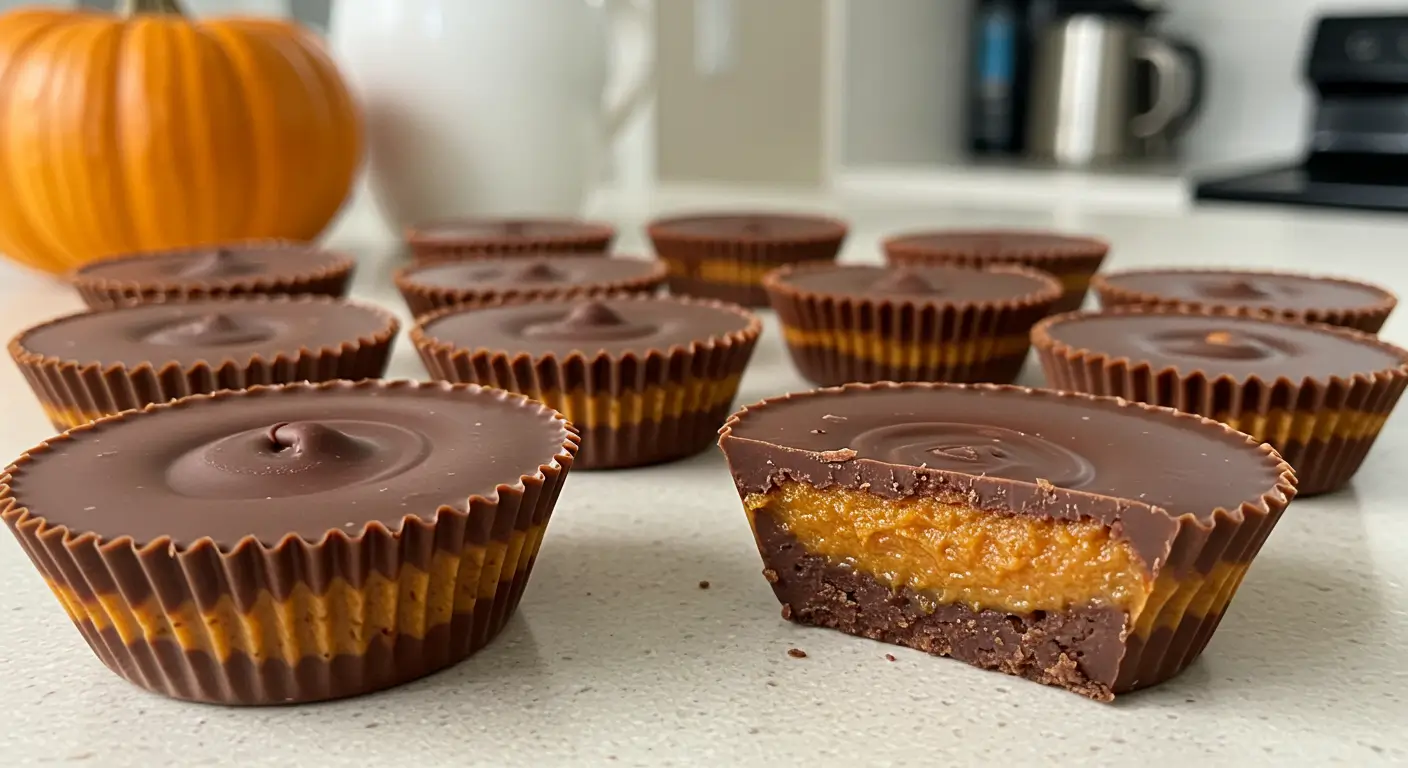
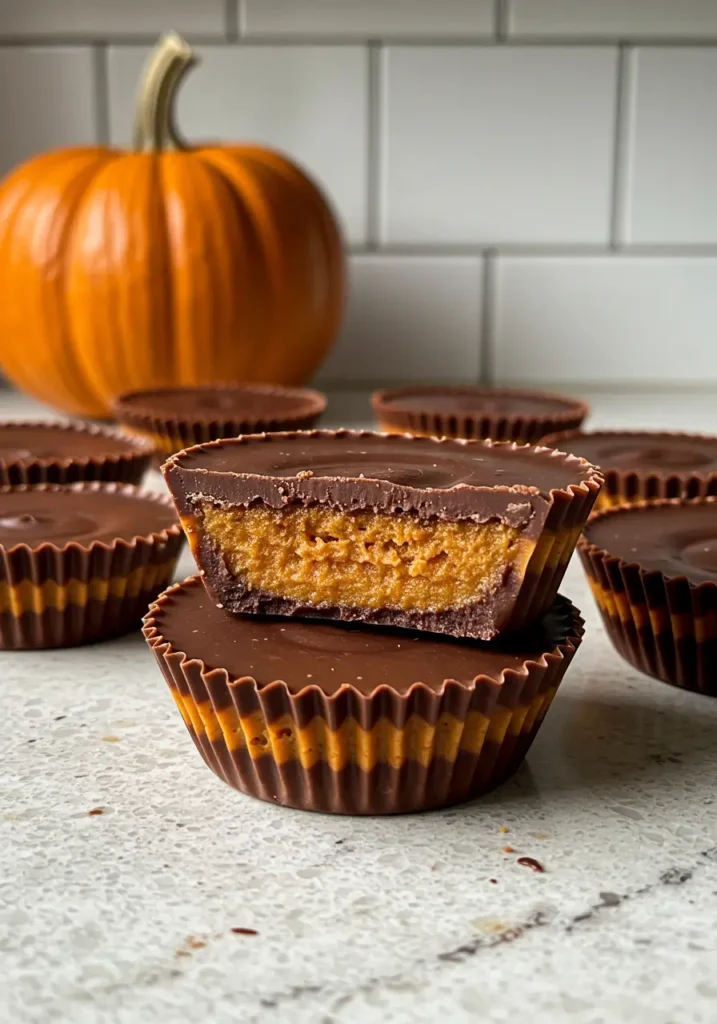
These aren’t your typical peanut butter cups (obviously), but they’ve got that same satisfying bite. The chocolate layer is rich and smooth—none of that weird chalky dairy-free stuff. The pumpkin filling? It’s like fall decided to have a party in your mouth. Sweet, spicy, and somehow both creamy and firm at the same time.
My 8-year-old nephew, who basically lives on chicken nuggets and fruit snacks, actually asked for seconds. That’s when I knew I’d figured it out.
The Ingredients (And My Shopping Disasters)
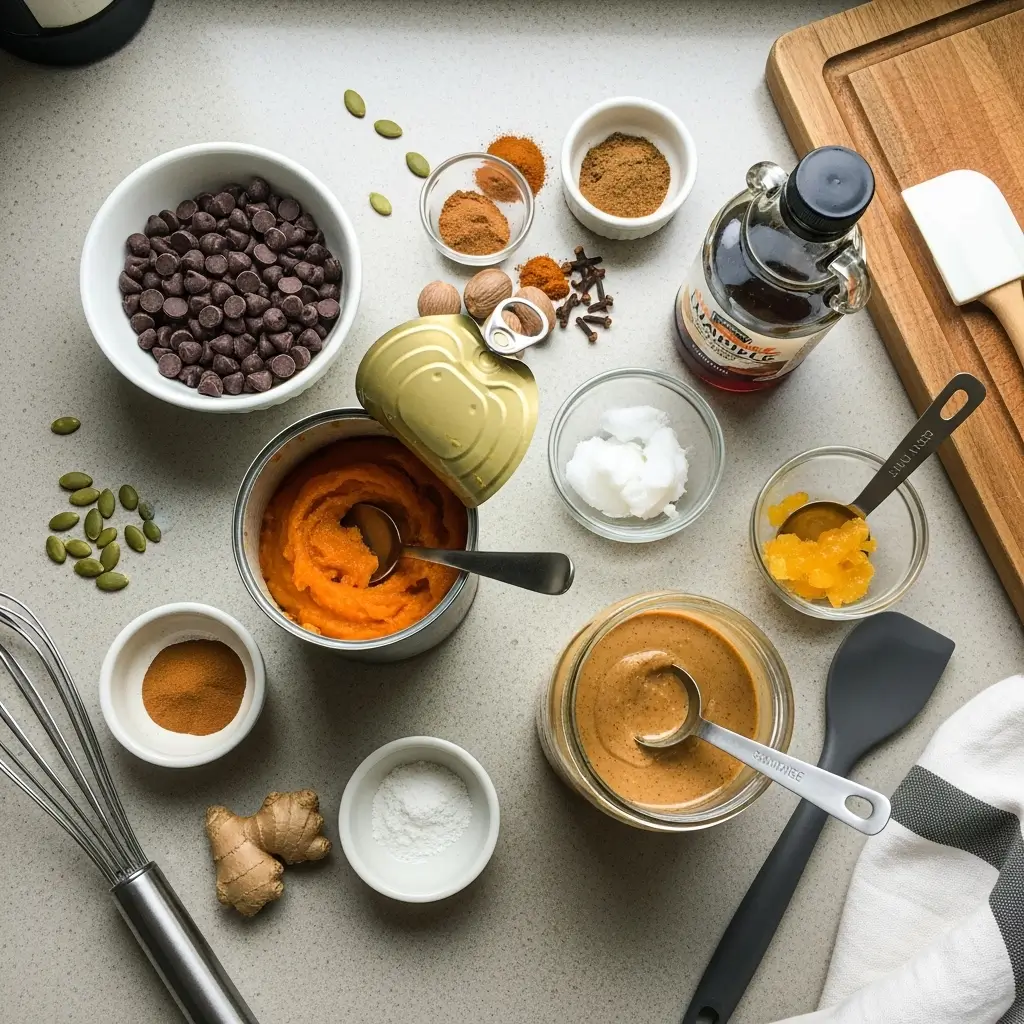
For the Chocolate Layers:
- 1½ cups dairy-free dark chocolate chips (I use Enjoy Life brand—don’t buy the cheap stuff, trust me)
- ¼ cup coconut oil, solid (not melted!)
- 2 tablespoons maple syrup
- ½ teaspoon vanilla extract
- Pinch of sea salt
For the Pumpkin Filling:
- ¾ cup pumpkin puree (NOT pumpkin pie filling—learned this the hard way)
- ⅓ cup natural almond butter (or sunflower seed butter if you’re nut-free)
- 3 tablespoons coconut flour
- 2 tablespoons maple syrup
- 1 teaspoon vanilla extract
- ½ teaspoon cinnamon
- ¼ teaspoon nutmeg
- ⅛ teaspoon ground ginger
- Tiny pinch of cloves (seriously, just a tiny bit)
- ¼ teaspoon salt
Now, here’s the thing about shopping for this stuff. First time I went to the store, I grabbed pumpkin pie filling instead of puree because I wasn’t paying attention. Don’t do that. The pie filling has all these spices already mixed in, and your cups will taste like someone dumped a spice rack into them.
Also, about the chocolate chips—I’ve tried probably six different brands at this point. Some melt weird, some taste like sadness, and some cost more than my monthly coffee budget. Enjoy Life or Guittard are my go-to brands. Worth the extra two dollars, I promise.
The Method (With All My Mess-Ups)
Step 1: Set Up Your Workspace
Get yourself a mini muffin tin and some paper liners. I tried making these without liners once because I ran out and thought, “How hard could it be?” Let’s just say I’m still finding chocolate bits stuck to that muffin tin.
Also, clear some space in your fridge. You’ll need it later, and there’s nothing worse than trying to balance a full muffin tin while moving leftover pizza boxes around. Been there.
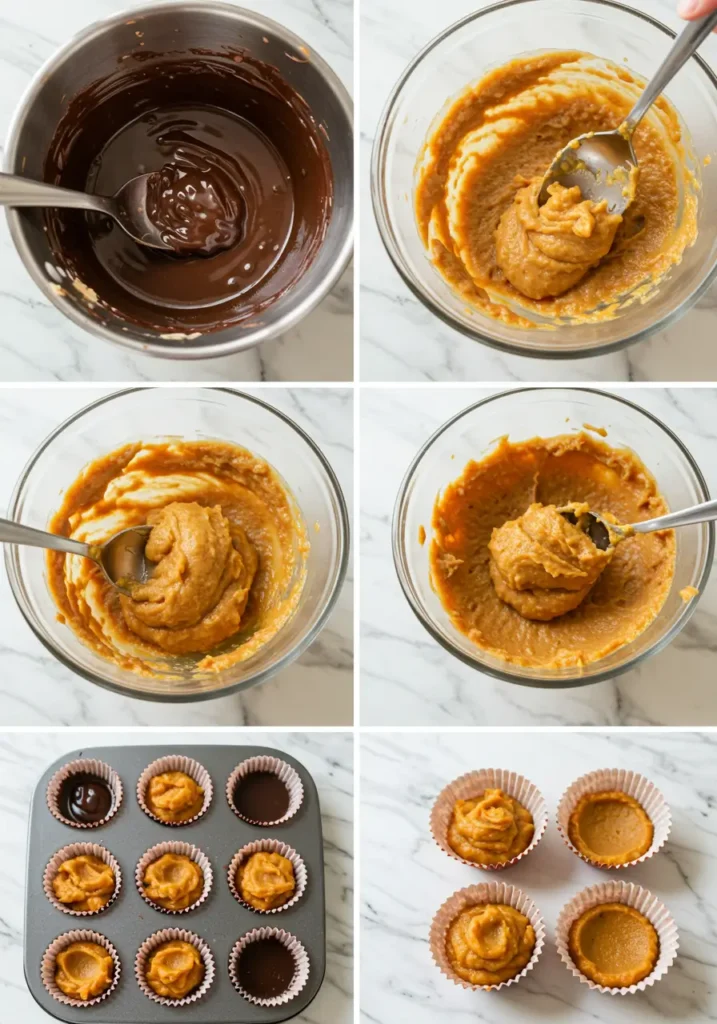
Step 2: Make the Chocolate Base
Melt 1 cup of the chocolate chips with 2 tablespoons of coconut oil in a double boiler. Don’t have a double boiler? Neither do I. Just put a bowl over a pot of simmering water. Works fine.
Actually, you know what? I usually just microwave it. Thirty seconds at a time, stirring between each round. Way easier, and you don’t have to wash extra dishes. Just don’t walk away from the microwave like I did last Tuesday—burned chocolate smells terrible and doesn’t scrape off easily.
Once it’s melted, stir in 1 tablespoon of maple syrup, ¼ teaspoon vanilla, and that pinch of salt. It’ll smell amazing at this point. Try not to eat it all with a spoon.
Step 3: First Chocolate Layer
Spoon about a teaspoon of chocolate mixture into each liner. Don’t stress about making it perfect—these are homemade, not factory-produced. Tip the tin around to spread the chocolate up the sides a little. This part is kinda fun, actually.
Pop them in the fridge for about 15 minutes while you make the filling.
Step 4: The Pumpkin Magic
Mix all the filling ingredients in a bowl. This is where things can go wrong if you’re not careful. The consistency should be like thick frosting—spreadable but not runny. If it’s too wet, add more coconut flour a teaspoon at a time. Too thick? Add a tiny bit more pumpkin puree.
I screwed this up the first time by adding too much maple syrup because I thought it needed to be sweeter. Spoiler alert: it didn’t. The chocolate is sweet enough.
Step 5: Assembly Time
Take your muffin tin out of the fridge. The chocolate should be firm but not rock-hard. Spoon about a teaspoon of pumpkin filling onto each chocolate cup. Leave some room at the top for the final chocolate layer.
This is where patience comes in handy. I know you want to just dump it all in there, but trust me—take your time. Otherwise, you’ll have lopsided cups that look like they were made by a toddler having a sugar crash.
Step 6: The Final Chocolate Layer
Melt the remaining ½ cup chocolate chips with 2 tablespoons coconut oil, 1 tablespoon maple syrup, and ¼ teaspoon vanilla. Same method as before.
Spoon this over the pumpkin layer to seal everything in. You want to cover the filling completely, but don’t stress if a little pumpkin peeks through. It actually looks kinda cool.
Step 7: The Waiting Game
Back in the fridge for at least 30 minutes. I know, I know—waiting is the worst part. I usually make myself a cup of tea and resist the urge to check on them every five minutes.
The Real Talk Section
Here’s what I wish someone had told me before I started this whole adventure:
These are not going to look like the Pinterest photos. And that’s okay! Mine are slightly lopsided, the chocolate layer isn’t perfectly smooth, and sometimes the filling shows through the sides. But they taste incredible, and isn’t that what actually matters?
The first batch I made, I got so frustrated trying to make them “perfect” that I almost threw the whole thing out. My husband found me stress-eating chocolate chips at 9 PM, covered in coconut flour, muttering about “stupid blogger recipes.”
But version 2.0 was better. Version 3.0 was actually good. And this final version? These disappear within hours of making them.
Storage and Serving (The Practical Stuff)
Keep these in the fridge. They’ll get soft at room temperature, especially in summer. I learned this the hard way when I left them on the counter during a barbecue in July. Chocolate soup, basically.
They’ll keep for about a week in the fridge, assuming you don’t eat them all first. You can also freeze them for up to three months, but honestly, they’ve never lasted that long in my house.
Serving-wise, take them out of the fridge about 10 minutes before you want to eat them. They’re good cold, but they’re even better when they’ve had a chance to soften up just a little.
My Random Discoveries
- Adding a tiny bit of espresso powder to the chocolate makes it taste more chocolatey. Weird but true.
- If you’re feeling fancy, sprinkle some flaky sea salt on top before the final chill. Game changer.
- Sunflower seed butter works just as well as almond butter if you’ve got nut allergies to worry about.
- Don’t double the recipe on your first try. I did this once and ended up with 48 cups and a very confused mailman who got sent home with a bag of them.
When Things Go Wrong
Because they will, and that’s normal.
If your chocolate seizes up: It happens. Usually means water got into it somehow. Start over with fresh chocolate, and make sure all your bowls and spoons are completely dry.
If your filling is too runny: More coconut flour. Add it slowly though—a little goes a long way.
If they won’t come out of the liners: They’re probably not cold enough yet. Give them another 15 minutes in the fridge.
If they taste too sweet: Add a pinch more salt to both the chocolate and filling. Salt balances sweetness better than you’d think.
The Verdict
Look, I’m not saying these will change your life or anything. But they might change your opinion about dairy-free desserts. They’re rich enough to satisfy your chocolate craving, fall-flavored enough to make you feel seasonal, and easy enough that you won’t want to throw things at your kitchen walls.
My sister, the one who went dairy-free, actually teared up a little when she tried them. Said it was the first dessert in months that didn’t taste like a compromise. That made the three failed attempts and the chocolate-covered kitchen totally worth it.
Plus, now I’ve got something to bring to fall potlucks that doesn’t require me to explain why there’s no dairy. People just eat them and ask for the recipe. Win-win.
Final Thoughts
If you try these, let me know how they turn out! Seriously, I’m curious if anyone else had the same disasters I did or if I’m just uniquely talented at messing up simple recipes.
And hey, if you’ve got any tricks for making them even better, share them. I’m always down to experiment, as long as it doesn’t involve starting from scratch again. My kitchen can only take so much chaos.
Happy fall baking! (And may your chocolate never seize up and your filling never be too runny.)

I’ve always found peace in the kitchen—it’s where I go to unwind, experiment, and reconnect. I started this blog because I wanted to share that feeling with others. My cooking journey started in a tiny apartment kitchen, with a second-hand skillet and a lot of trial and error.
Since then, I’ve learned that the best meals aren’t the most complicated—they’re the ones made with love (and maybe a little butter). Whether you’re a beginner or a kitchen pro, I hope you’ll feel right at home here.