
The Pumpkin Snickerdoodles That Finally Got Me Through Fall
Okay, so I messed this up four times before getting it right. Four. Times.
Look, I’m gonna be honest with you—I thought making pumpkin snickerdoodles would be easy. How hard could it be, right? Take regular snickerdoodles, add some pumpkin, boom. Done.
Wrong. So very wrong.
The first batch came out flat as pancakes. The second batch? Rock hard. Third time I somehow forgot the cinnamon sugar coating entirely (don’t ask me how, I was having a week). But the fourth batch… oh man, the fourth batch was magic.
Now I’ve got people asking for this recipe constantly. My neighbor knocked on my door last Tuesday specifically to ask if I had any left. I didn’t. They were gone within two hours of coming out of the oven.
Table of Contents
How This Recipe Actually Happened
I think I originally got the idea from Pinterest? Or maybe it was my aunt Linda. Honestly can’t remember anymore. All I know is that regular snickerdoodles are great, but there’s something about fall that makes you want to put pumpkin in everything. And I mean everything—I’ve seen pumpkin mac and cheese, which is… questionable.
But pumpkin snickerdoodles? That actually makes sense. The spices work together, the texture gets this amazing chewiness, and they smell like autumn had a baby with a bakery.
Version 1.0 was basically pumpkin-flavored cardboard. I used way too much flour because I was scared they’d be too wet. Version 2.0 went the opposite direction—so much pumpkin they wouldn’t hold together. It was a disaster. Complete disaster.
Then I figured out the secret. Well, two secrets actually.
First: you can’t just dump pumpkin puree into regular snickerdoodle dough and expect it to work. The moisture content is all wrong. You need to adjust the dry ingredients AND you need to chill the dough. Trust me on this one.
Second: brown butter. Game changer. I discovered this by accident when I got distracted by a phone call and my butter turned golden. Instead of starting over (because who has time for that?), I went with it. Best mistake I ever made.
What You Actually Need
For the cookies:
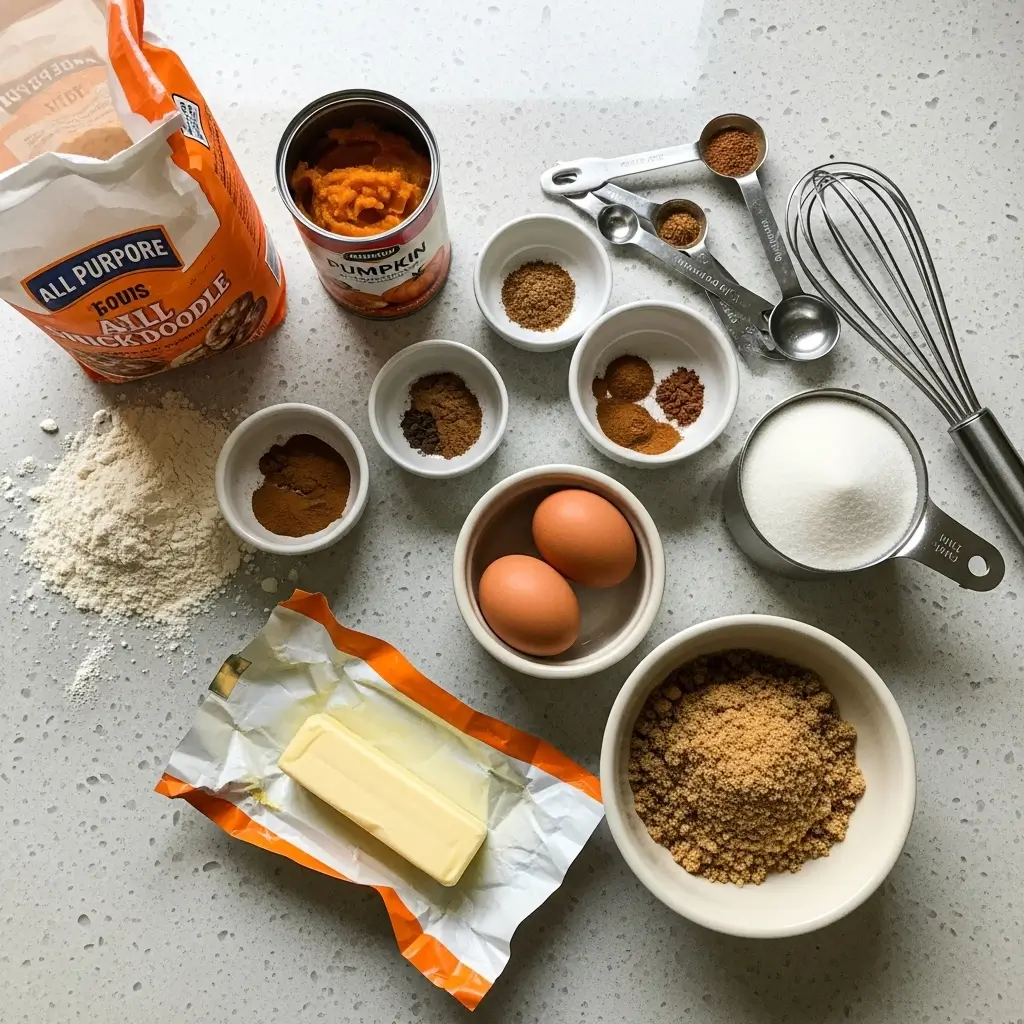
- 2 1/4 cups all-purpose flour (don’t use self-rising, learned that the hard way)
- 1/2 teaspoon baking soda
- 1 teaspoon cream of tartar
- 1/2 teaspoon salt
- 1 teaspoon ground cinnamon
- 1/2 teaspoon ground nutmeg
- 1/4 teaspoon ground cloves (or just skip this if you don’t have it)
- 1/2 cup unsalted butter (the good stuff, not margarine)
- 1/2 cup vegetable oil (I use whatever’s on sale)
- 3/4 cup granulated sugar
- 1/2 cup brown sugar, packed
- 1 large egg
- 1 teaspoon vanilla extract
- 3/4 cup pumpkin puree (NOT pumpkin pie filling, different thing entirely)
For the cinnamon sugar coating:
- 1/4 cup granulated sugar
- 1 tablespoon ground cinnamon
Shopping tip: Good luck finding decent pumpkin puree after Thanksgiving. Stock up in October when it’s everywhere. I learned this the hard way trying to make these in January.
The Step-by-Step (With My Commentary)
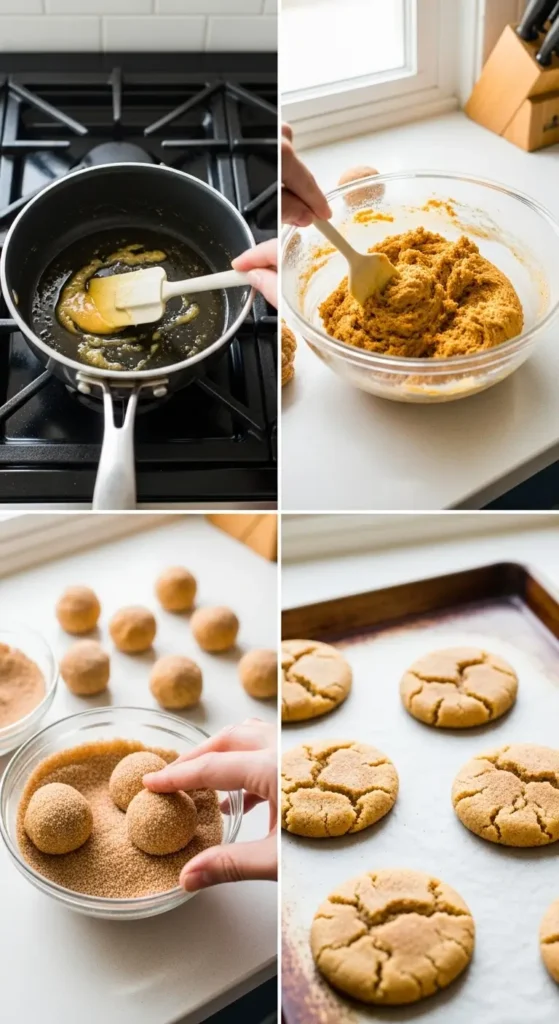
1. Brown the butter first (15 minutes, maybe 20 if you’re being careful)
Put the butter in a small saucepan over medium heat. Let it melt completely, then keep cooking, stirring occasionally. It’ll foam up, then the foam will subside, and the butter will turn golden brown. You’ll smell this amazing nutty aroma—that’s when you know it’s ready.
Don’t walk away during this part. I burned it once because my eight-year-old needed help finding his other shoe. Set it aside to cool for about 10 minutes.
2. Mix your dry ingredients (5 minutes)
In a medium bowl, whisk together flour, baking soda, cream of tartar, salt, cinnamon, nutmeg, and cloves. The key is—oh wait, I forgot to mention—you need to preheat your oven to 350°F first. Always forget that step.
3. Combine wet ingredients (10 minutes)
In a large bowl, mix the cooled brown butter with the vegetable oil. Yeah, it looks weird. Kinda greasy and separated. That’s normal.
Add both sugars and mix until combined. It won’t look like traditional cookie dough at this point. Add the egg, vanilla, and pumpkin puree. Mix until smooth.
Here’s where I messed up the first three times: I added everything at once. Don’t do that. The pumpkin will make everything clump together in a gross way.
4. Combine wet and dry (5 minutes)
Add the dry ingredients to the wet mixture gradually. I use a wooden spoon, not a mixer, because these can get tough if you overmix. Fold everything together until just combined.
The dough will be soft. Like, really soft. Softer than regular snickerdoodle dough. First time I made this, I panicked and added more flour. Don’t. It’s supposed to be soft.
5. Chill time (At least 2 hours, preferably overnight)
Cover the bowl with plastic wrap and stick it in the fridge. This is not optional. I tried skipping this step once (I was impatient), and the cookies spread into one giant pancake cookie.
Use this time to clean up your kitchen. Or binge-watch something. Whatever.
6. Make the cinnamon sugar coating (2 minutes)
Mix the 1/4 cup sugar with cinnamon in a small bowl. Easy.
7. Shape and coat (15 minutes)
Take the chilled dough out of the fridge. It should be firm enough to handle now. Scoop out about 1 1/2 tablespoons of dough (I use a cookie scoop because I’m not measuring tablespoons by hand like some kind of pioneer).
Roll each portion into a ball with your hands. They might be a little sticky still—that’s fine. Roll each ball in the cinnamon sugar mixture until coated.
8. Bake (12-14 minutes)
Place cookies on parchment-lined baking sheets, about 2 inches apart. They will spread, so don’t crowd them.
Bake for 12-14 minutes. They’ll look slightly underdone when you take them out—soft in the center, just barely set around the edges. This is what you want. They’ll continue cooking on the hot pan.
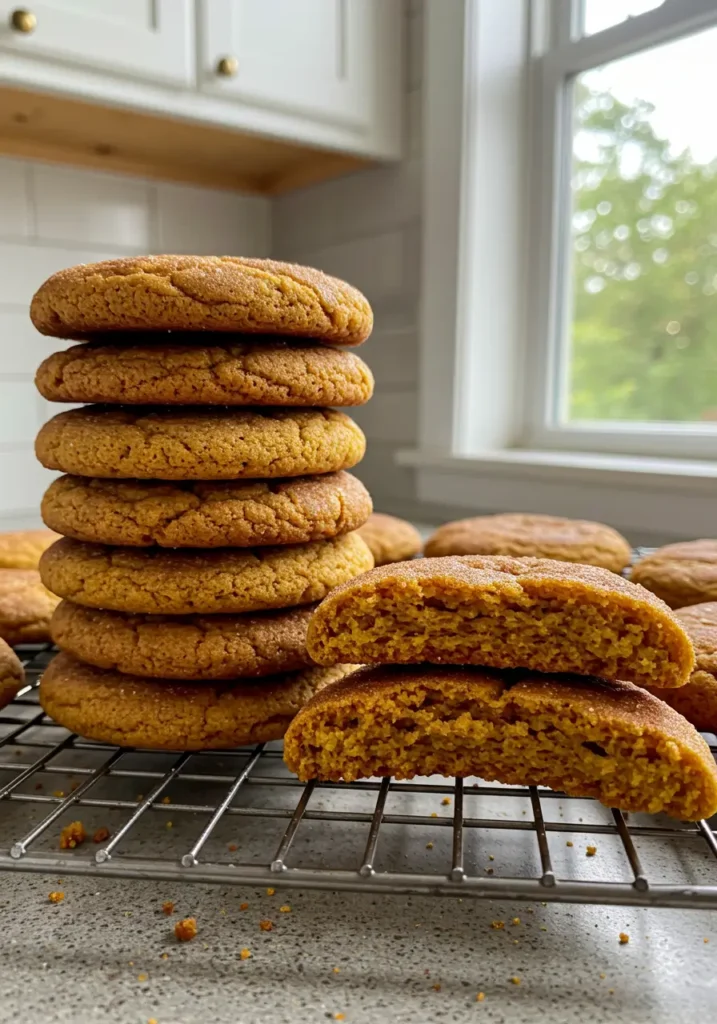
Let them cool on the baking sheet for 5 minutes before transferring to a wire rack. (Trust me on this one—I’ve broken so many cookies being impatient.)
Things I’ve Learned the Hard Way
About the pumpkin: Use real pumpkin puree, not pumpkin pie filling. Pie filling has spices and sugar already added, and it’ll throw off the whole recipe. I used pie filling once by accident and they were way too sweet and weirdly textured.
About the chilling: Yes, you really need to chill the dough. I know it’s annoying. I know you want cookies NOW. But soft dough = flat cookies. Cold dough = perfect thick cookies.
About the brown butter: If you accidentally burn it (it happens), start over. Burnt butter tastes bitter and will ruin the whole batch. Ask me how I know.
Storage: These keep for about a week in an airtight container. They also freeze really well—just thaw at room temperature for about 20 minutes.
Why These Work So Well
The brown butter adds this incredible depth of flavor that regular butter just can’t match. It’s nutty and rich and makes everything taste more complex. The pumpkin keeps them soft and chewy, while the cream of tartar gives them that classic snickerdoodle tang.
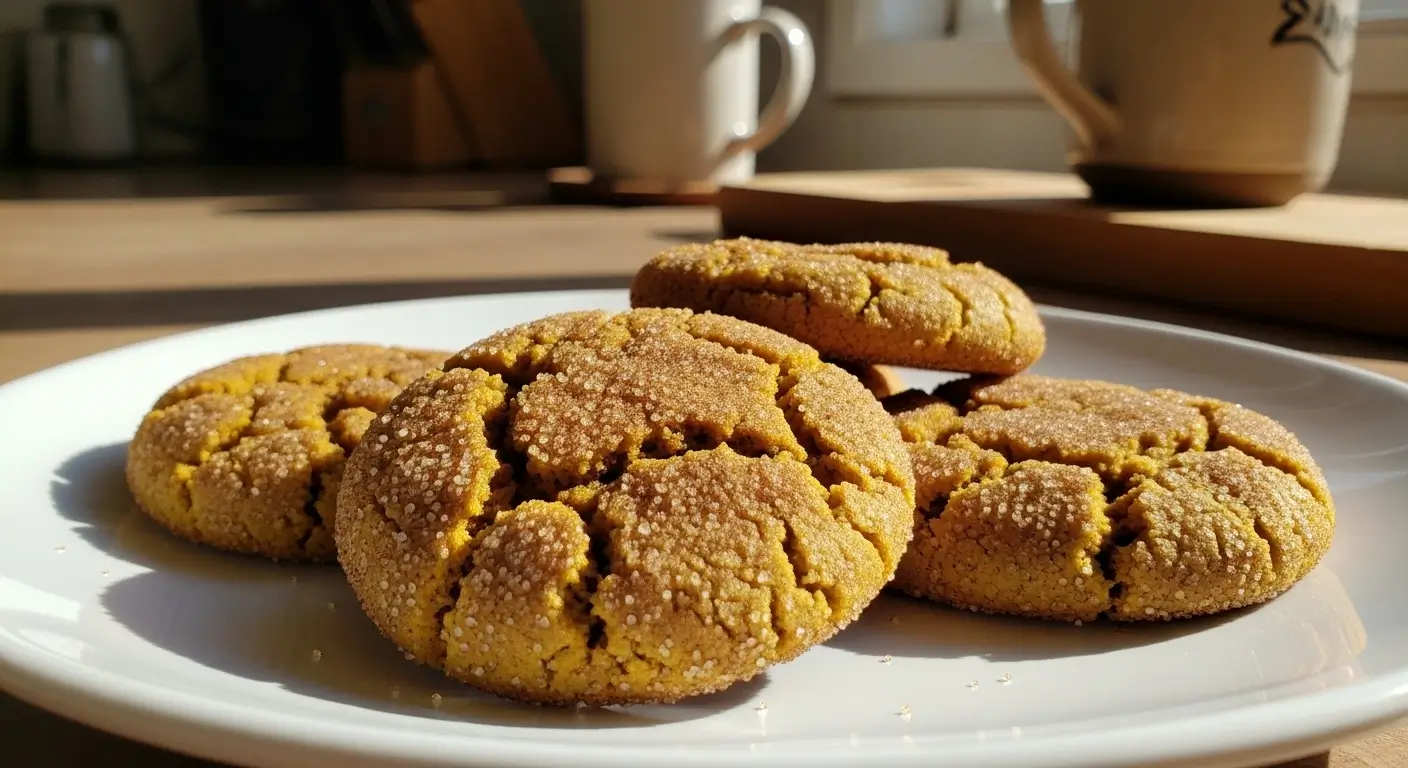
And the spice blend? Chef’s kiss. Cinnamon, nutmeg, and just a touch of cloves. It’s warm and cozy without being overwhelming. My neighbor Sarah swears these taste like fall in cookie form.
The texture is what really gets people though. They’re soft and chewy with just a tiny bit of crisp around the edges. The cinnamon sugar coating adds texture and extra sweetness. They’re substantial—one cookie actually feels like a treat, not like you need to eat five to feel satisfied.
Some Random Tips That Actually Matter
Size matters: Don’t make them too big. I learned this when I made giant cookies for a potluck and they took forever to bake through. Stick to about 1 1/2 tablespoons of dough per cookie.
Don’t overbake: Seriously. They look underdone when they’re perfect. Overbaked pumpkin cookies turn into sad, dry disappointments.
Make ahead: The dough can be chilled for up to 3 days. Sometimes I make the dough on Sunday and bake fresh cookies throughout the week. Game changer for busy mornings.
Double the coating: I always make extra cinnamon sugar coating because I inevitably spill some or use more than the recipe calls for. Better to have too much than run out halfway through.
When These Really Shine
These are perfect for fall potlucks, Halloween parties, or just because it’s Tuesday and you want something that tastes like autumn. They’re not too fancy, but they’re special enough that people remember them.
I brought them to my kid’s school fall festival last year and had three different parents ask for the recipe. One mom said her picky eater (who usually only eats plain sugar cookies) devoured two of these.
They’re also great with coffee or apple cider. Something about the spices just works with warm drinks. I’ve been known to have one (okay, two) with my morning coffee and call it breakfast. Don’t judge.
The Bottom Line
Look, I’m not saying these are life-changing. But they’re really, really good. They’re the cookies that disappear first at parties. They’re what I make when I want to feel like I have my life together. They’re comfort food in cookie form.
Are they perfect? No. The dough is finicky and you have to plan ahead with the chilling. But the payoff is worth it.
If I can make these without burning down my kitchen (and I have questionable cooking skills on my best days), anyone can. Just follow the recipe, don’t skip the chilling step, and brown that butter like your life depends on it.
Now I’m craving these again. Thanks a lot, brain.
Happy baking! (And may your smoke alarms stay quiet) 🍂
If this dessert brought a little joy to your day, why stop here? I’ve got a whole collection of indulgent treats and easy bakes waiting for you to try. Take a peek at more of my favorite desserts Here

I’ve always found peace in the kitchen—it’s where I go to unwind, experiment, and reconnect. I started this blog because I wanted to share that feeling with others. My cooking journey started in a tiny apartment kitchen, with a second-hand skillet and a lot of trial and error.
Since then, I’ve learned that the best meals aren’t the most complicated—they’re the ones made with love (and maybe a little butter). Whether you’re a beginner or a kitchen pro, I hope you’ll feel right at home here.