
Red Velvet Cheesecake Brownies: The Ultimate Triple-Threat Dessert
I’ll never forget the first time I made these red velvet cheesecake brownies. It was one of those rainy Saturday afternoons when I was craving something sweet but couldn’t decide between brownies, cheesecake, or red velvet cake. So naturally, my brain went, “Why not all three?” My husband thought I was crazy when I told him my plan, but three hours later, he was eating his third piece and asking if I could make them again next weekend.
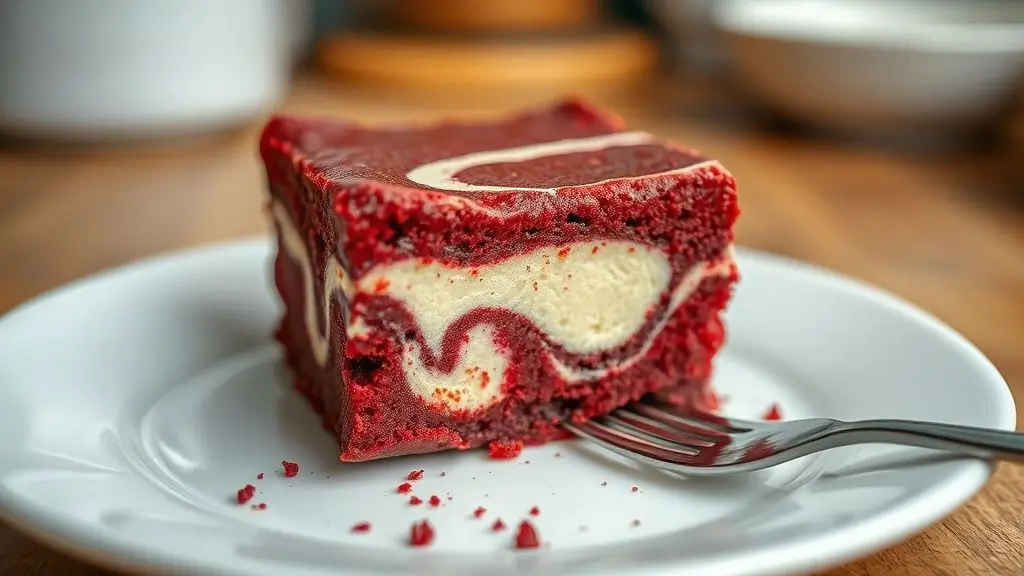
These aren’t your average brownies. They’re like the overachiever of the dessert world – rich, fudgy red velvet base with swirls of creamy cheesecake throughout. Every bite gives you that perfect combination of tangy cream cheese, subtle cocoa, and that classic red velvet flavor that somehow tastes like childhood birthday parties and fancy bakeries all at once.
The first time I brought these to a potluck, I watched people’s faces as they took their first bite. You know that moment when someone tastes something so good they have to close their eyes and do a little happy dance? That happened at least five times that night. I’ve been making them for every special occasion since, and they never fail to steal the show.
Table of Contents
Why You’ll Love These Red Velvet Cheesecake Brownies
These brownies are basically three desserts having the best possible party in one pan. The red velvet base is perfectly fudgy – not too cake-like, not too dense – with that subtle chocolate flavor that makes red velvet so special. The cheesecake swirl adds this incredible creamy tang that cuts through the richness in the most amazing way.
What I love most is how they look as gorgeous as they taste. When you cut into them, you get these beautiful marbled patterns of deep red and creamy white. They’re Instagram-worthy without trying too hard, and trust me, people will be asking for the recipe before they even finish their first bite.
They’re also surprisingly easy to make. You don’t need any fancy equipment or professional baking skills – just two bowls, a whisk, and a little patience while they bake. I’ve made them with my ten-year-old nephew, and he did most of the work himself. If a kid can nail these, anyone can.
The texture is what really sets them apart from regular brownies. They’re dense and fudgy like a good brownie should be, but the cheesecake swirl adds this luxurious creaminess that makes each bite feel special. They’re rich enough to satisfy any chocolate craving but not so heavy that you feel guilty having a second piece.
What You’ll Need
For the Red Velvet Brownie Base:
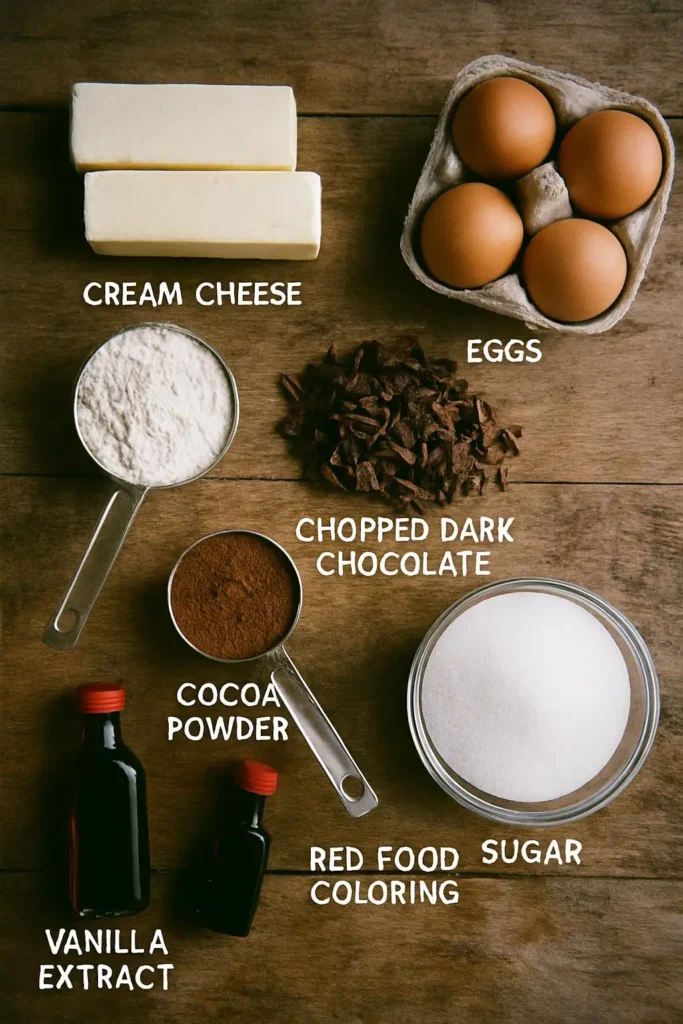
- 1 cup unsalted butter – I always use real butter; it makes such a difference in flavor
- 4 oz semi-sweet chocolate, chopped – good quality chocolate matters here
- 1½ cups granulated sugar – this creates that perfect fudgy texture
- 3 large eggs – room temperature works best for smooth mixing
- 1 teaspoon vanilla extract – use pure vanilla if you have it
- 1 cup all-purpose flour – don’t overpack when measuring
- 3 tablespoons cocoa powder – unsweetened cocoa powder works best
- 1 tablespoon red food coloring – gel food coloring gives the best color
- 1 teaspoon white vinegar – this reacts with the cocoa to enhance the red velvet flavor
- ½ teaspoon salt – brings out all the other flavors
For the Cheesecake Swirl:
- 8 oz cream cheese, softened – leave it out for at least 2 hours before baking
- ⅓ cup granulated sugar – just enough to sweeten the cream cheese
- 1 large egg – room temperature blends better
- 1 teaspoon vanilla extract – complements the red velvet perfectly
- Pinch of salt – balances the sweetness
The key to perfect red velvet flavor is the combination of cocoa powder, vinegar, and food coloring. Some people skip the vinegar, but it really does make a difference in that classic red velvet taste. Don’t worry – you won’t taste it in the final product, but it helps develop that signature flavor.
Let’s Make These Beauties
Step 1: Prep Your Pan and Oven
Preheat your oven to 350°F and line a 9×13 inch baking pan with parchment paper, leaving some overhang for easy removal. I learned this trick after struggling to get brownies out of pans cleanly – the parchment paper is a game-changer. Give it a light spray with cooking spray just to be safe.
Step 2: Make the Cheesecake Mixture
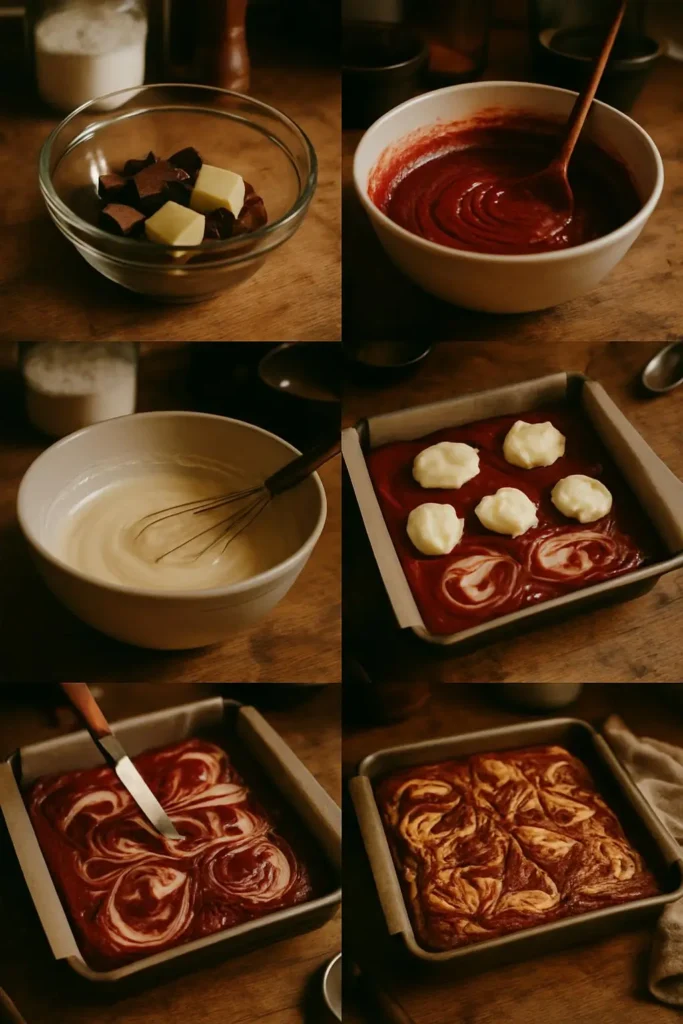
Start with the cheesecake layer because it’s quick and easy. In a medium bowl, beat the softened cream cheese until it’s smooth and creamy – this takes about 2 minutes with an electric mixer. Add the sugar, egg, vanilla, and salt, beating until everything is well combined. The mixture should be smooth with no lumps. Set this aside while you work on the brownie base.
Step 3: Melt the Chocolate and Butter
In a large microwave-safe bowl, melt the butter and chopped chocolate together. I do this in 30-second intervals, stirring between each one, until it’s completely smooth. You can also do this in a double boiler if you prefer. Let it cool slightly – you don’t want it so hot that it cooks the eggs when you add them.
Step 4: Build the Brownie Base
Whisk the sugar into the cooled chocolate mixture until well combined. Add the eggs one at a time, whisking well after each addition. The mixture should be glossy and smooth. Stir in the vanilla, red food coloring, and vinegar. The color should be a beautiful deep red at this point.
In a separate bowl, whisk together the flour, cocoa powder, and salt. Gradually fold this dry mixture into the chocolate mixture until just combined. Don’t overmix – you want to maintain that fudgy texture.
Step 5: Create the Swirl Magic
Pour the red velvet brownie batter into your prepared pan and spread it evenly. Now comes the fun part – dollop spoonfuls of the cheesecake mixture over the top of the brownie batter. Use a knife to gently swirl the cheesecake into the brownie batter, creating those beautiful marbled patterns. Don’t overdo it – you want distinct swirls, not a muddy mess.
Step 6: Bake to Perfection
Bake for 35-40 minutes, or until a toothpick inserted in the brownie portion comes out with just a few moist crumbs. The cheesecake swirl might still look slightly soft, but it’ll set as it cools. Don’t overbake – these are supposed to be fudgy, not cake-like.
Cooling and Cutting Tips
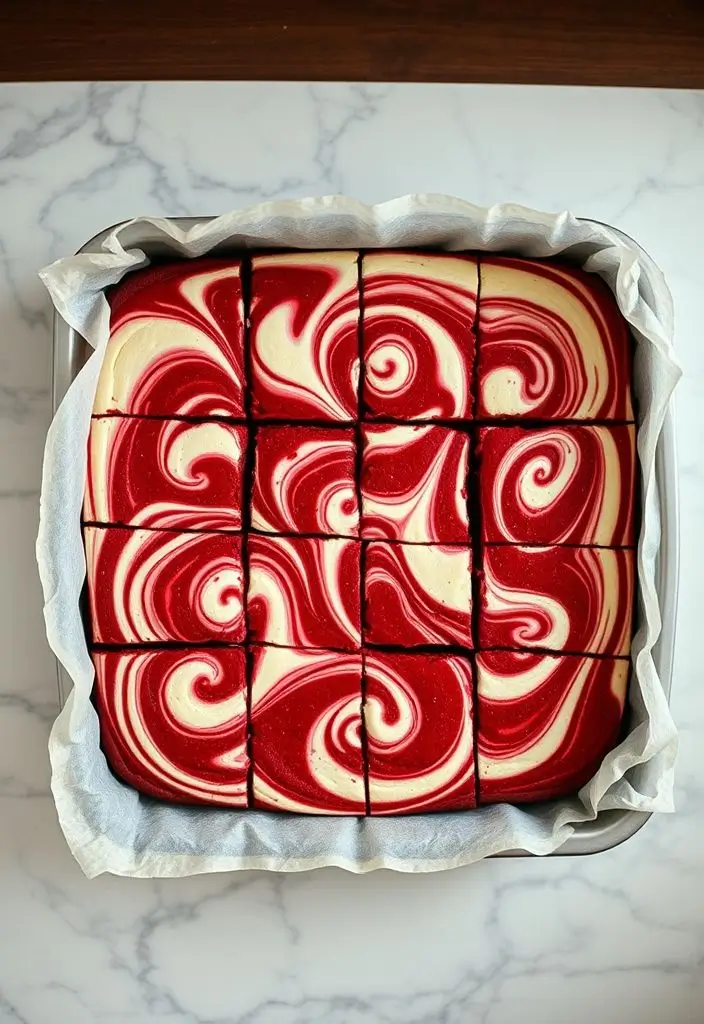
Let the brownies cool completely in the pan before cutting. I know it’s torture to wait, but trust me on this one. If you cut them while they’re still warm, you’ll end up with a gooey mess instead of clean, pretty slices. I usually let them cool for at least 2 hours, or even overnight if I’m making them ahead.
When you’re ready to cut, use the parchment paper overhang to lift the entire slab out of the pan. Use a sharp knife, and clean it between cuts for the prettiest slices. I like to cut them into squares – I usually get about 24 pieces from a 9×13 pan.
Serving and Storage
These brownies are perfect at room temperature, but they’re also amazing chilled. I actually prefer them cold from the fridge – the cheesecake layer firms up and creates this incredible contrast with the fudgy brownie base. They’re rich enough that smaller squares are plenty satisfying.
Store them covered in the refrigerator for up to 5 days. They freeze beautifully too – just wrap individual pieces in plastic wrap and freeze for up to 3 months. Let them thaw at room temperature for about 30 minutes before serving.
Tips from My Kitchen
Food coloring matters: Gel food coloring gives you that vibrant red color without thinning the batter. Liquid food coloring works too, but you’ll need more of it.
Don’t skip the vinegar: I know it seems weird, but the vinegar reacts with the cocoa powder to create that classic red velvet flavor. It’s not optional.
Room temperature ingredients: This is especially important for the cream cheese. Cold cream cheese will create lumps that are impossible to smooth out.
Swirl technique: Less is more when creating the swirl pattern. A few gentle figure-8 motions with your knife will create beautiful patterns without muddying the colors.
Storage tip: If you’re making these for a party, they actually taste better the next day. The flavors meld together and the texture becomes even more perfect.
Portion control: These are rich, so cut them smaller than you think you need. People can always go back for seconds, but nobody wants to feel overwhelmed by a huge piece.
These red velvet cheesecake brownies have become my signature dessert, and I’m not exaggerating when I say they disappear faster than anything else I make. There’s something about that combination of flavors and textures that just makes people happy. Every time I make them, I’m reminded why I fell in love with baking in the first place – it’s all about creating something that brings joy to the people you care about.

I’ve always found peace in the kitchen—it’s where I go to unwind, experiment, and reconnect. I started this blog because I wanted to share that feeling with others. My cooking journey started in a tiny apartment kitchen, with a second-hand skillet and a lot of trial and error.
Since then, I’ve learned that the best meals aren’t the most complicated—they’re the ones made with love (and maybe a little butter). Whether you’re a beginner or a kitchen pro, I hope you’ll feel right at home here.